Song Editor
In the song editor, build the arrangement: the order in which patterns play. Each slot below the main toolbar shows its pattern number in two-digit hex.

Novice mode
Novice mode hides the temporary loop, the tick counter, the event strip's right-click menu, and Replace Instrument... and Transform... on a slot's right-click menu, whose shortcuts still work. See Experience Level.
Pattern Arrangement
Each slot refers to a pattern numbered from 0 to 255. The song plays the slots from left to right, then stops or returns to the loop point if one is set.
Hover a slot to see, in brackets at the start of its tooltip, the time the song reaches it. A double-click plays the song from that time.
Patterns not used by any slot appear after the arrangement, dimmed and separated by a gap. To use these unused patterns, drag them into the arrangement or right-click one and choose Add to Song. You can also select and edit several at once; see Selecting Unused Patterns.
While the song plays, the slot that is playing is shown slightly larger than the others and fills from left to right as its pattern plays, so you can find it even when it is selected or has a pattern color.
Click Add in the first empty slot, after any unused patterns, to add and select a new pattern at the end of the song. The button is unavailable while previewing an unused pattern. In a long song, scroll to the end to reach it.
A slot whose pattern has a warned row has a warning mark; hover it to read the warning. Unused patterns are marked the same way, and resource fights do not mark a slot. See Warnings.

Pattern Colors
You can color-code patterns to find them at a glance, just like instruments. Right-click a slot (or an unused pattern) and use the Set Pattern Color submenu to pick a preset color, Randomize Color for a random one different from the current color, Custom Color... to choose any color in the Custom Color dialog, or Clear Color to remove it. With several slots or unused patterns selected, the choice applies to all their patterns, and Randomize Color asks whether they should share one random color or each get a different one (see Random Pattern Colors Question).
The color marks every slot that plays the pattern. Colors are saved with the song and kept when a pattern is duplicated. A color change can be undone.
Event Strip
The slim bar along the bottom of the song slots opens the event strip, an overview of the whole song under the slots, as does the narrow button with a caret just left of the slots. Click either again to close it, or use View > Show Event Strip or Ctrl+Shift+G from anywhere. Drag the bar to resize the strip, or drag it nearly all the way up to close the strip, which then opens again at the height it had; View > Reset Layout restores its height. The stretch of strip under each slot covers the time that slot plays. The strip is closed when RhYMe starts and when you start a new song; opening a song leaves it as it was.
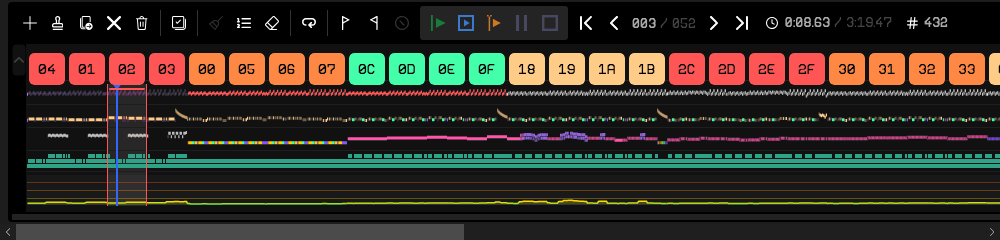
From the top, the strip can show a row for each channel followed by three graphs. At first it shows only the channel rows; right-click it to add the graphs (see below).
- The three channel rows show what each channel plays. Each note appears in its instrument's color, higher for a higher note, so melodies, bass lines and drums are easy to tell apart. An effect sample shows on its channel's row for as long as it plays. A silent channel's row is empty.
- Timers draws, as bars, how many timers the song keeps running at once for its effects and samples, from none at the bottom to one for every channel at the top. Each bar is made of one block per running timer, so you can count them at a glance.
- Samples draws, as bars, how many channels are playing a sample at once, on the same scale.
- CPU load (estimated) draws, as a line, roughly how much of the computer's time the replay takes in each frame, with marks at a quarter, half and three quarters. Its color changes with the load, from green when the replay is light through yellow at a tenth of the frame to red when it takes the whole frame. It is an estimate based on measurements of the exported Atari ST player, usually within a tenth of the real load. Timer effects decide most of it: the more often a timer interrupts the computer, the more time the replay takes, whether the timer plays a square, a wavetable or a sample. A sample or wavetable played through volume transformations takes a little more, so the line follows the song's Optimize for setting (see Volume Control). With Lean timer ticks chosen in the export, the replay takes somewhat less.
Right-click the strip to choose what it shows: check or clear Channels, Timer Count, Sample Count and Estimated CPU Load. At least one always stays on, and RhYMe remembers your choice. In Novice mode the strip has no right-click menu and shows only the channel rows.
Hover over the strip to see what it shows at that spot, such as a channel's note and instrument, a sample, or the CPU load as a percentage, with the slot, row, time and frame. Where a graph covers several frames at one spot, it shows the highest value, so a short peak is never missed.
RhYMe calculates the strip by playing through the song when you open it and shortly after you stop editing. A spinner appears while the strip is being calculated or is about to change.
Turn the mouse wheel over the slots or the strip to scroll along the song.
A vertical line marks the song position. While the song plays, the line follows it. While nothing plays, it shows where Play from Cursor would start, and a handle at its top lets you drag it.
- Click anywhere in the strip to select the pattern under the pointer, as clicking its slot does. The pattern editor's cursor stays on its row. While the song plays, playback jumps to the start of that pattern.
Ctrl+clickthe strip to set the song position there. While nothing plays, the cursor moves to that slot and row; while the song plays, playback jumps there.- While nothing plays, drag the line, or its handle, to move the cursor along the song.
- Drag anywhere else in the strip to select the song slots you drag across, whole slots at a time.
- Double-click the strip to play the song from the start of the pattern under the pointer, or
Ctrl+double-clickit to play from that exact spot. While something plays, playback jumps there instead and keeps playing the song or the pattern, whichever was playing.
The selected song slots are also marked on the strip, so you can see which stretch of the song a selection covers, and watch it grow as you drag across the strip.
The strip is worked out again shortly after you stop editing, while it is open. A slot the song never reaches has an empty stretch. Where a pattern break (effect D) ends a slot early, the rest of its stretch is left empty; hovering there says so, and Ctrl+click there sets the song position to the last row played in that slot.
Song Editor Toolbar

The toolbar is split into two groups. The left group contains pattern and loop editing buttons. The right group contains the play/stop transport buttons (Play Song F5, Play Pattern F6, Play from Cursor Shift+F7, Pause F7, Stop F8), the navigation buttons and position indicator, and the playback counters: song position (m:ss.ff), total duration and tick counter (T:).
Stopping or pausing the song, or reaching its end, silences it at once but without a thump. Notes the song itself ends, and the exports, end as they do on the Atari ST.
The collapse toggle, or clicking Song Editor, the panel's name beside it, hides the arrangement and disables the editing buttons; navigation, Clear Temp Loop Range and the position indicator still work. The collapse state is saved across sessions, and View > Reset Layout expands the panel again.
Ctrl+click Play Song to play the song ignoring the temporary loop (the same as Ctrl+F5).
| Button | Shortcut | Description |
|---|---|---|
| Add New Pattern | Ctrl+Shift+N |
Create a new empty pattern and insert a slot for it after the cursor, or at the end of the song while you preview an unused pattern. It takes back the number of a pattern you deleted earlier, where there is one, so the numbering fills in rather than growing |
| Duplicate Slot | Ctrl+D |
Insert a copy of the current slot after the cursor |
| Duplicate Pattern | Ctrl+Shift+D |
Duplicate the current pattern into a new slot after the cursor; with several slots selected, duplicate each selected slot's pattern into new slots after the selection |
| Remove from Song | Del |
Take the current slot out of the arrangement, leaving its pattern in the song (or, on unused patterns, delete them outright) |
| Delete Pattern | Shift+Del |
Delete the pattern the cursor slot plays outright, taking every slot that plays it with it; with several slots selected, delete every pattern they play |
| Select All | Ctrl+A |
Select every arrangement slot at once, so a following Cut, Copy, Remove, Duplicate, or Set Pattern Color acts on the whole arrangement. The shortcut works while the strip has the keyboard |
| Remove Unused Patterns | — | Remove all unused patterns and renumber the rest |
| Renumber Patterns | — | Reorder the patterns so the used ones come first, with contiguous numbering |
| Clear Song | — | Reset all patterns and the arrangement to a single blank pattern; instruments, samples, arpeggios, vibratos, and the song's Information are left untouched. Available here only, with no keyboard shortcut |
| Loop Start | — | Set the arrangement loop point at the cursor, or clear it when it is already there |
| Set Temp Loop Start | — | Set a temporary loop start at the cursor |
| Set Temp Loop End | — | Set a temporary loop end at the cursor |
| Clear Temp Loop Range | — | Clear the temporary loop range (stays enabled when collapsed) |
| Go to Song Start | Home / Ctrl+Shift+, |
Jump to the first arrangement slot |
| Previous Song Position | Ctrl+, |
Move cursor left in arrangement |
| Next Song Position | Ctrl+. |
Move cursor right in arrangement |
| Go to Song End | End / Ctrl+Shift+. |
Jump to the last arrangement slot |
| Position indicator | — | Current slot / total slots |
Metronome and Count-in
The Metronome and Count-in buttons are on the main toolbar, after the octave setting.
- Metronome (
Alt+M): while it is on, every beat the song or a pattern plays is marked by a click, on the rows the pattern editor highlights. A beat is Rows per beat rows and a bar Beats per bar beats, both set in the song properties. The first beat of each bar gets a louder, higher click. The click is added alongside the chip rather than played by it, so it is not part of the song: it does not show on the oscilloscopes and is never exported. Songs a playlist plays are not clicked. - Count-in (
Alt+N): while it is on, playing the song or a pattern from the editor starts with bars of clicks before the first row is heard, so you can get ready to play along or record. The clicks fall on every beat, and the first beat of each bar gets the louder click, whether or not the metronome is on. A count-in row lasts as long as a row of the song where playback starts. Jumping elsewhere while the song plays and resuming a paused song start at once, without a count-in. - The arrow beside the Count-in button chooses how long the count-in lasts: one, two, three or four bars. It lasts two bars until you choose another length.
Both buttons and the count-in length are remembered between sessions.
Loop Points
Arrangement Loop
A stored loop point determines where playback jumps to after reaching the end of the arrangement. When set, an L marker appears above the loop start slot. The loop always spans from the loop start to the end of the arrangement.
A note, sample or effect still sounding when playback reaches the loop start from the slot before it keeps sounding into the loop on every pass, just as it did the first time, so the loop sounds the same each time around, in RhYMe, in the WAV and MP3 exports and on the Atari ST. When you start playback on a slot inside the loop, nothing is playing yet when it first gets there, so every pass starts with the loop's own rows only.
- Set via the loop toolbar button, or right-click a slot and choose Set Loop Start (the item reads Clear Loop Start when the loop already starts there)
- Click and drag the L marker to reposition it
- Clear by toggling the loop start at its current position
Temporary Loop
A temporary (unsaved) loop range overrides the stored loop point for preview purposes. It is visualized with two markers:
- S marker below the temp loop start slot
- E marker below the temp loop end slot
Set a temp loop range by:
Alt+dragon a slot to define both start and end in one gesture- Right-click a slot and choose Set Temp Loop Start or Set Temp Loop End
Ctrl+Shift+Left-clickto set start;Ctrl+Shift+Right-clickto set end (no menu opens on that right-click)- Drag the S or E markers individually to reposition
The temp loop is never saved and clears when another song is loaded. Press Ctrl+F5 (or Ctrl+click the Play Song button) to play the song once ignoring it.
While the temp loop is in force, the song only plays inside it: playing from a slot outside it starts at the temp loop start instead. Playing a single pattern is not affected.
Navigation and Editing
Press Ctrl+` from anywhere to put the keyboard on the song editor, the way F9 does for the pattern editor; a collapsed song editor opens first.
Use the Left/Right arrow keys or the Previous/Next Song Position buttons to move between slots, and Home/End to jump to the first or last slot. During playback, these keys also move playback to the new slot. The strip scrolls to keep the cursor slot in view. You can also use:
| Action | Result |
|---|---|
| Left-click a slot | Selects the slot and navigates the pattern editor to its pattern |
Ctrl+click a slot |
Add or remove that slot from the selection (individual multi-select) |
Shift+click a slot |
Select the range from the anchor (last plain click) to the clicked slot |
Shift+Left / Shift+Right |
Grow the range one slot at a time |
| Double-click a slot | Starts song playback from that slot |
Ctrl+double-click a slot |
Starts pattern playback of that slot |
| Drag a slot | Reorder the arrangement; dragging a selected slot moves the whole selection. While the song is playing it keeps playing from where it is |
Ctrl+drag a slot |
Drop a copy at the release position (the whole selection when the slot is selected) |
| Left-click an unused pattern | Select it and show it in the pattern editor without adding it to the song |
Ctrl+click an unused pattern |
Add or remove that pattern from the unused-pattern selection |
Shift+click an unused pattern |
Select the run from the anchor (last plain click) to the clicked pattern |
| Drag an unused pattern | Insert it into the arrangement at the drop position; dragging a selected pattern brings the whole selection |
Ctrl+A |
Select every arrangement slot |
Ctrl+C / Ctrl+X |
Copy / cut the selected slots |
Ctrl+V |
Paste the copied slots after the cursor; rows copied in the pattern editor are pasted into the pattern editor instead, at its cursor, while it is in view |
Ctrl+D / Ins |
Duplicate the current slot after the cursor — or every selected slot when several are selected |
Ctrl+Shift+D |
Duplicate the current pattern into a new slot after the cursor |
Del |
Remove the selected slots (or the single cursor slot) |
Shift+Del |
Delete the pattern the cursor slot plays, and every slot that plays it |
| Right-click a slot | Open the slot's right-click menu |
| Right-click an unused pattern | Open the same menu; choose Add to Song to insert it into the arrangement after the cursor (Add Patterns to Song when several are selected) |
While you drag, an insertion cursor marks the gap where the slot will land, and every slot of the song is outlined so the gaps between them are easy to see. Holding the pointer near the left or right edge of the strip while dragging scrolls it, so you can drop the slot beyond what is in view.
Selecting and Copying Slots
You can select several arrangement slots and cut, copy, paste, delete, or drag them as a group to duplicate, move, or remove a section of the arrangement.
- Individual slots:
Ctrl+clickslots to add or remove them one at a time (the selection can be discontiguous). - A range: click a slot to set the anchor, then
Shift+clickanother slot to select everything between them, or pressShift+Left/Shift+Rightto grow the range one slot at a time. - All of them:
Ctrl+Awith the strip focused, or the Select All button on the toolbar. - A plain click or arrow-key move collapses the selection to a single slot. Taking the cursor slot out of the selection with
Ctrl+clickmoves the cursor to the nearest slot still selected.
Once slots are selected, use Ctrl+C to copy or Ctrl+X to cut them, then Ctrl+V to paste after the cursor; to paste at the end of the song, right-click the empty area past the last slot and choose Paste (see Past the Last Slot). Cut slots paste once, copied slots as often as you like. Pasted slots play the same patterns, and you can paste into another RhYMe window.
Drag any selected slot to move the whole selection, or Ctrl+drag to drop a copy and keep the originals. The drag starts only once you reach another slot, so a slightly shaky click stays a click. Del removes the selected slots. The arrangement always keeps at least one slot, so removing every slot leaves one behind, playing an empty pattern. Every change can be undone.
Removing slots never deletes their patterns: a pattern no other slot plays joins the unused patterns, where RhYMe selects it and scrolls it into view.
To delete the pattern itself, right-click the slot and choose Delete Pattern, or press Shift+Del. This also removes every slot that plays it; with several slots selected it reads Delete Patterns and deletes each pattern they play. The cursor moves to the slot that followed. Deleting the patterns of every slot leaves one slot behind, playing an empty pattern, since a song always has at least one. One Undo brings everything back.
Right-clicking a slot that is part of your selection keeps the whole selection, so the right-click menu acts on every selected slot. Ctrl+D and Ins duplicate the selected slots, and Ctrl+Shift+D gives each selected slot a fresh copy of its pattern, inserted after the selection.
Selecting Unused Patterns
The unused patterns select the same way the arrangement slots do:
- Individual patterns:
Ctrl+clickunused patterns to add or remove them one at a time. - A run: click an unused pattern to set the anchor, then
Shift+clickanother to select the unused patterns between them. - A plain click collapses the selection to a single pattern. The pattern editor shows the pattern you clicked last; taking it out of the selection moves the preview to the nearest one still selected. While you preview an unused pattern, the slot selection steps aside and comes back when you click a slot.
- Clicking an arrangement slot (or moving the cursor there) clears the unused-pattern selection.
With a selection in place:
- Add Patterns to Song on the right-click menu inserts them all into the arrangement after the cursor, in pattern order.
- Dragging any selected pattern into the arrangement drops the whole selection at that position.
- Delete Patterns (or
Del) deletes every selected pattern (Delete Pattern for one). Other patterns keep their numbers, and the next pattern you add takes a freed number. The song always keeps at least one pattern. - Set Pattern Color colors every selected pattern at once. Randomize Color asks whether to give them all the same color or each a different one.
Adding, duplicating and removing patterns leave the strip and playback where they were. Each of these is a single undoable step.