Instrument Editor
The instrument editor is where you design your sounds. Each instrument is a sequence of steps that set the YM2149's registers over time. 8. Sound Generation explains what each tone mode and timer mode does, and 10. Creating Instruments walks through building some common instruments.
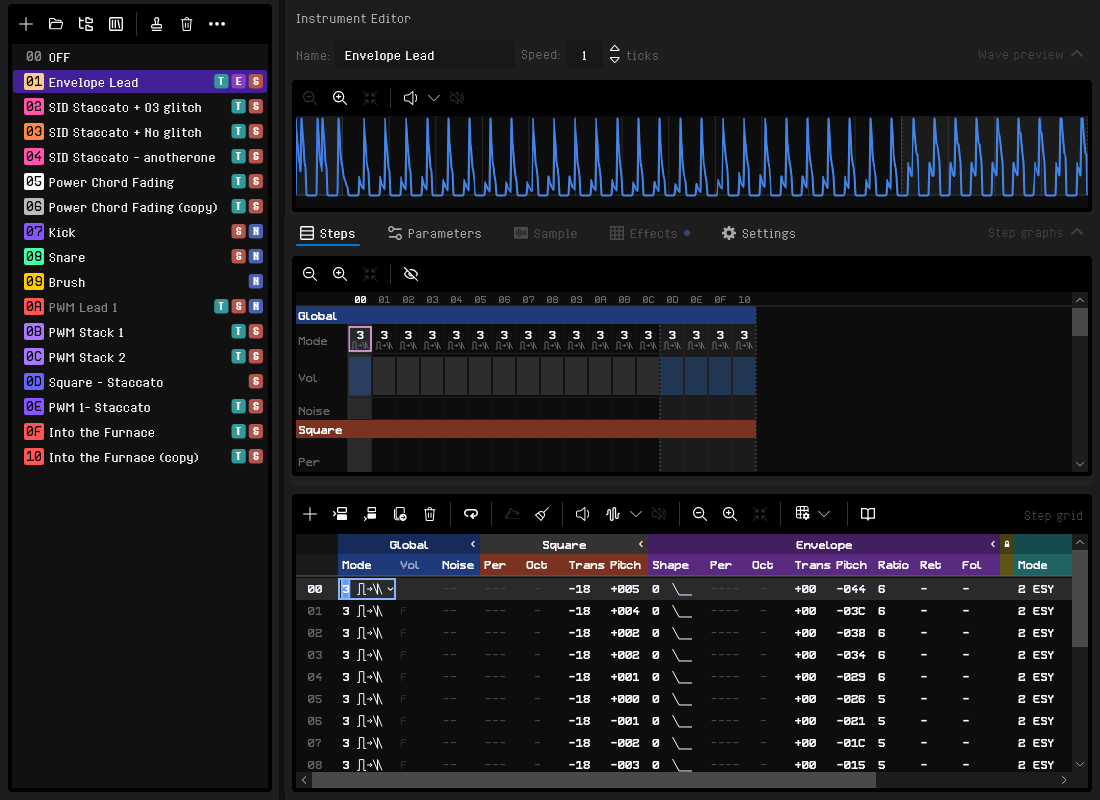
Instrument List
The instrument list appears when the Instruments tab is selected. It shows every instrument in the song with its number and name.
The list starts with a fixed 00 OFF entry, which you can select but not edit, move or delete. While it is selected the editor is hidden, entering notes in the pattern grid writes OFF notes (===) that silence the channel, and any preview stops whatever is playing. Your instruments are numbered from 01 onward.
Instruments that no pattern row uses are dimmed; Select Unused selects them all.
While the song plays, the instruments you can hear are highlighted. Notes you play on the keyboard or a MIDI keyboard, and the preview buttons, highlight their instrument too; an instrument on a muted channel is not highlighted. Turn the highlights off with View > Highlight Playing Items, a setting the arpeggio, vibrato, sample and wavetable lists share with the step marks and song lines in the Steps tab.
Double-click an instrument to hear it, the same as the Preview button: it plays through once and stops, or repeats if it loops, whatever the Stop note preview on key release setting. A keyboard note held on an instrument without a loop also plays it only once.
Drag an instrument to another place in the list to renumber it. The pattern rows that use it, and those of the instruments it moves past, are renumbered too, so every row keeps playing the same instrument. One undo puts it back. The 00 OFF entry cannot move.
Select several instruments with Ctrl+click and Shift+click, or with Select All and Select Unused on the toolbar. Delete Instrument and the color items of the right-click menu then act on all of them, and dragging one of them moves them all, gathered together in list order where you let go.

List Toolbar
| Button | Description |
|---|---|
| Add Instrument | Add a new instrument named New Instrument at the end (max 255). It loops from its first step, so a held note keeps sounding. Ctrl+Shift+N does the same while the list has focus |
| Open File | Load one or more .rhi files as new instruments (Ctrl+Alt+L) |
| Browse Instruments | Take instruments from your songs and instrument files (Ctrl+Alt+B, see below) |
| Browse Standard Library | Take instruments from the ones that come with RhYMe (Ctrl+Alt+K, see below) |
| Duplicate Instrument | Clone the selected instrument |
| Delete Instrument | Remove the selected instruments. If the song plays them, you are asked first what should happen to those notes (see Delete Instrument). Delete in the list does the same and keeps the focus there, so you can press it again. The instrument below is selected next, or the new last one when you deleted the last, or OFF when none is left |
| Select All | Select every instrument |
| Select Unused | Select the instruments no pattern row uses. Replacing an instrument, saving it and its color are on the right-click menu |
| Preview | Play the selected instrument; clicking again restarts it |
| Preview ▾ | Menu with Preview Instrument and Preview Instrument Looped (see Looped Previews) |
| Stop Preview | Stop whatever preview is playing, whichever tab started it. See 5. Main Window |
Note
A .rhi file stores the wavetables and the sample the instrument plays. Loading it adds them to the song, reusing any identical copy the song already has; any that do not fit are left out and fall silent.
Feature Badges
Each instrument shows badges for the hardware features its steps use:
| Badge | Feature |
|---|---|
| N | Noise generator used in at least one step |
| S | Square wave used in at least one step |
| E | Hardware envelope used in at least one step |
| T | MFP timer (pulse-width modulation, envelope synchronization, envelope volume modulation or a wavetable) used in at least one step |
| W | Wavetable played in at least one step (also shows T) |
| P | The instrument plays a sample with its notes |
| A | The instrument is achromatic |
The same badges appear in the instrument selector on the main toolbar. Turn them off with View > Show Instrument Badges to give names more room; the choice is remembered.
Strategic use of features
Many of these features are shared by all three channels, so the badges show at a glance which instruments may compete for them.
Instrument Browser
The instrument browser lists the instruments of a song (.rhs) or of the standard library. You can listen to any of them and bring them into your song without opening the song they come from.
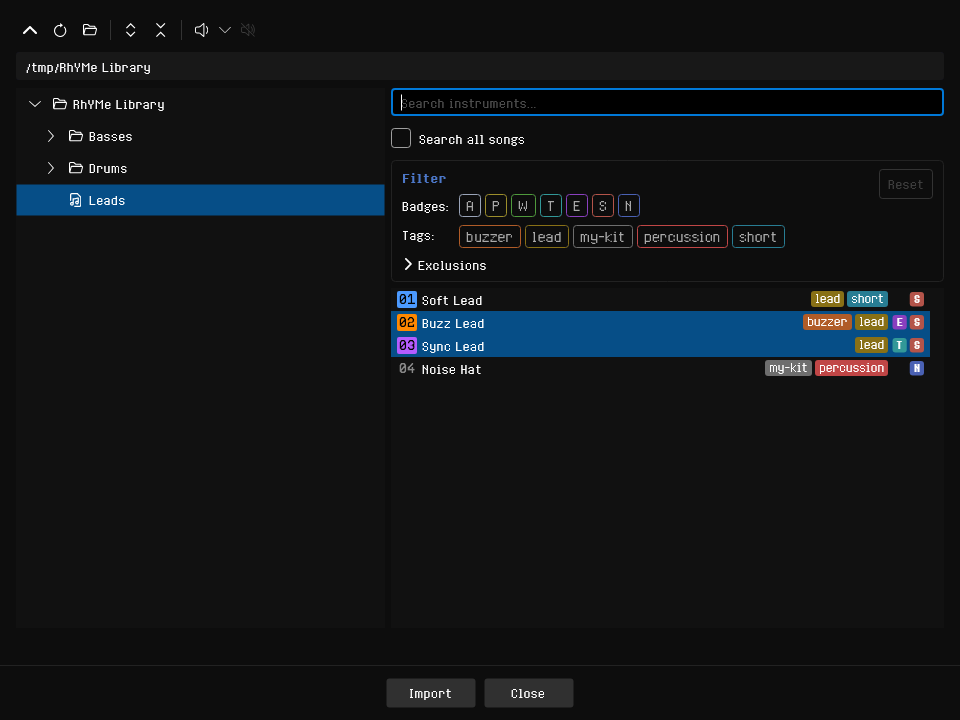
There are four ways to open it:
- Browse Instruments (
Ctrl+Alt+B) on the list toolbar adds the instruments you take at the end of your list. The browser stays open so you can take more; press Close when you are done. - Browse Standard Library (
Ctrl+Alt+K) does the same with the instruments that come with RhYMe. - Replace from Another Song… (
Ctrl+Shift+B) on an instrument's right-click menu puts the one you take over that instrument and closes the browser, as Replace with File… does with a.rhifile. - Replace from Standard Library… (
Ctrl+Alt+Shift+K) does the same from the standard library.
The browser's button reads Import or Load to match. Opening the browser pauses playback; press Pause (F7) afterwards to continue.
Finding instruments. A web page cannot look through the folders on your computer, so Browse Instruments and Replace from Another Song… first ask you to pick a song file, and the instrument browser then lists that song's instruments. A large song can take a moment to read; until its instruments appear, the line under the list says the song is being read.
Standard Library. The instruments that come with RhYMe, the same as examples/Instruments.rhs. Browse Standard Library and Replace from Standard Library… show just these, without folders, and you listen to and take them as from a song.
Searching. Type in the search box above the list to show only the instruments whose names contain the text. It filters whatever the list shows. The box has the focus when the browser opens; Ctrl+F goes back to it, Enter or Down moves to the first match, and Escape clears it.
Filtering. Each instrument's tags are shown after its name. In the Filter box below the search box, click a badge under Badges or a tag under Tags to show only the instruments that have it; click it again to show them all. A badge or tag that is switched on is filled in its color, and one that is off is only outlined. You can switch on several at once, and then only the instruments that have all of them are shown. To hide the instruments that have a badge or tag instead, click Exclusions to show a second Badges and Tags row, and click the badge or tag there. Collapsing these rows again switches their badges and tags off. A badge or tag can't be on in both rows at once, so switching it on in one switches it off in the other. The filters work together with the search and stay on as you select other songs, and the browser remembers them: the next time you open it, the badges and tags you left on are on again. Click Reset to switch them all off and collapse the exclusions; the search is kept. Every instrument in the standard library is tagged, so you can, for example, switch on bass to see just the basses. In Novice mode neither Badges row is shown, and the Filter box is shown only when there are tags to choose from.
Listening.
- Press Preview (
Space) or/to hear the selected instrument, from the tree or the list;Ctrl+/or the arrow beside Preview plays it looped (see Looped Previews) - The note keys play it at other pitches. A key outside the instrument's key range plays nothing, and a warning at the bottom says why
- The octave keys work as in the main window and set the same octave:
`for octave 0,F1toF4for 1 to 4,Shift+F1toShift+F4for 5 to 8, and=and-(or Numpad+and-) for one octave up or down. In the path and search boxes these keys type text, and in the tree Numpad+and-open and close folders - Only one preview sounds at a time: selecting an instrument, Preview or a note key cuts off whatever was playing. A held note key plays once, without auto-repeat
- An instrument is heard with the wavetables and sample its song or file contains
- Timer effects always play as the instrument was made, even where your song's Timers or Timer channels settings would not allow them. A warning icon beside such an instrument says what it would lose in your song, and the browser asks you to confirm before taking it
- Stop Preview or
Escapestops the sound;Escapeagain closes the browser
Taking them. Press Import (or Load), press Enter, or double-click an instrument; double-clicking also closes the browser. Select several with Ctrl+click, Shift+click or Ctrl+A to import them together, in list order. The line under the list shows what was added, and one Undo takes an instrument back.
An instrument brings its wavetables and its own sample with it, reusing any identical copy (same name and contents) your song already has. Nothing else of the other song is taken, and that song is only read, never opened.
If your song is full, Import is unavailable; importing more than fits adds what fits and says how many did not. A file that cannot be read is mentioned under the list.
Instrument Details
Select an instrument to edit it in the right panel. Opening a song selects its first instrument.
Name and Speed

- Name: The instrument's name, up to 64 characters
- Speed: How many song ticks each step lasts (1–255): 1 advances every tick, higher values hold each step longer. A pattern can change the rate with the
SInn(Instrument Speed) effect, or jump to or hold a step withP(Instrument Step), without changing this setting
Waveform Preview
A waveform strip between the header and the tabs shows what the instrument sounds like at its preview pitch, with the selected step highlighted. Click it to go to a step. While you preview the instrument or the song plays it, a line marks the place being played. The Wave preview button beside the instrument's name hides and shows it.
The height of the waveform shows loudness on the same scale for every instrument, with silence at the bottom, as in the main window's oscilloscopes. Zoom Out, Zoom In and Reset Zoom on its toolbar zoom it horizontally. Steps that play a wavetable are shown with the song's own wavetables, as they sound.
Double-click in the wave preview to hear just the step under the pointer; Ctrl+double-click repeats it until you stop the preview (see Looped Previews).
Tabs
The instrument's settings are on tabs below the strip. The Parameters, Sample and Effects tabs are marked while any of their settings differ from a new instrument's, and on each tab every changed setting is marked too (in the Effects grid, a cell's check box in Mapping or its number in Ratios). On the Effects tab, the Mapping and Ratios tabs above the grid are marked the same way while any of their cells differ, so you can see which view to open.
The Reset button on these three tabs puts every setting on the tab back to a new instrument's, in one undoable step; it is available only while something has changed. Resetting the Parameters tab includes settings Novice mode hides but keeps the fixed note; resetting the Sample tab leaves the steps alone.
Steps Tab
The Steps tab contains the step grid, where you edit the steps, and above it the step graphs, which draw each step parameter across all steps.
RhYMe plays your song to find the steps no note reaches and fades their numbers, in the step grid and above the step graphs; hover one for an explanation. The marks update a moment after you stop editing, and an unused instrument is not marked. If this slows down a long song, turn Mark Unused Steps off in the step grid's view options.
While the song plays the instrument, a mark in front of a step number shows the step each channel is on, as the instrument list marks the instruments you can hear; a preview of the instrument marks its step the same way. The step graphs and the wave preview draw a line on the step being played, for the song as for a preview, with a line for each channel that plays the instrument, and the curve editor draws one too. Notes you play on the keyboard or a MIDI keyboard mark their steps too. A muted channel shows neither a mark nor a line. View > Highlight Playing Items turns the marks and the lines off.
Step Toolbar
| Button | Shortcut | Description |
|---|---|---|
| + Append Step to End | Ctrl+Ins |
Append a blank step to the end, wherever the cursor is, and move the cursor onto it |
| Insert Step Before Cursor | Ins |
Open a gap above the current step |
| Insert Step After Cursor | Shift+Ins |
Open a gap below the current step |
| Duplicate Step | Ctrl+D |
Clone the current step and insert after it |
| - Delete Step | Shift+Del |
Remove the current step |
| Set Loop Start | Ctrl+L |
Set the instrument loop at the cursor step, or clear it when it is already there |
| Draw Curve | Ctrl+K |
Open the curve editor on the column under the cursor (see Drawing a Curve) |
| Clean Up | — | Tidy the instrument up without changing how it sounds (see Clean Up Instrument) |
| Preview Instrument | / |
Play the full instrument; clicking again restarts it |
| Preview Step | Shift+/ |
Play the current step on its own, or the selected steps |
| Preview ▾ | — | Menu with both previews, each also looped (see Looped Previews) |
| Stop Preview | Esc |
Stop whatever preview is playing, whichever tab started it |
| Zoom Out / Zoom In | — | Make the step grid's text smaller or larger, as Ctrl+wheel over the grid does. Not shown in Novice mode |
| Reset Zoom | — | Put the step grid's text back to its usual size. Not shown in Novice mode |
| View Options | — | Mark Unused Steps, which fades the numbers of the steps your song never reaches |
| Help | Ctrl+Shift+I |
Open the Instrument Step Parameter Reference |
Click a step's number to select the whole step; Shift+click a number, or drag down the numbers, to select a run of steps. While you drag out a selection, holding the pointer near the top or bottom edge of the grid scrolls it, so the selection can reach steps out of view. With steps selected, Preview Step plays them all; Ctrl+click on the button or Ctrl+/ repeats them until you stop it (see Looped Previews).
Looped Previews
Every Preview Instrument button has an arrow beside it that opens a menu with the button's preview and the same preview looped; on the step toolbar it lists both previews, each also looped. The arrow is beside the Preview button of the instrument list, the wave preview, the main toolbar, the instrument browser and the curve editor.
- Preview Instrument Looped plays the instrument until you stop it: its own loop if it has one, otherwise from the first step again after the last.
Alt+/does this anywhere in the main window except the pattern editor, where those keys play the note at the cursor, and the Samples tab, where they play the sample looped (see Samples) - Preview Step Looped repeats the step under the cursor, or the selected steps, the same as
Ctrl+clickon Preview Step orCtrl+/ - In the wave preview,
Ctrl+double-clickrepeats the step you clicked in - In the instrument browser,
Ctrl+/plays the selected instrument looped
A preview length set under General Settings does not cut these short.
Looping
After its last step, a looping instrument goes back to its loop start step, so it sounds for as long as the note is held. An instrument without a loop stops after its last step.
- Set the loop start with Set Loop Start (
Ctrl+L); pressing it on the loop start clears it - The loop always runs from the loop start to the last step
- The loop start step shows an
Lbefore its number, and the steps that repeat are marked in the step grid, the step graphs and the wave preview
Step Grid Columns
Each step can set any combination of the YM2149's sound parameters, one column each; see 19. Complete Parameter Reference for every column. The columns are grouped under Global (Mode, Vol, Noise), Square, Envelope, Sample and Timer, each with a short name such as Per, Oct or Pitch.
Setting the pitch. The Square and Envelope groups each set their side's pitch in the same way. Leave Per empty and the side follows the note being played: Oct transposes it by octaves, Trans by semitones, and Pitch shifts it by period units, higher for a positive value. A period unit is a small interval on a low note and a large one on a high note. Write a period in Per and the side plays that period whatever note is played, so its Oct and Trans no longer change it; Pitch still fine-tunes the written period. See Notes and Periods, and the Note Period Table for the period of each note.
A cell showing -- is not set on this step: the step uses the note or the default (no noise, no offset, no forced period), not what an earlier step set.
Cells are dimmed where they have no effect:
- columns the step's tone mode does not use, such as the envelope columns in Square Only mode
- the whole Envelope group on a step that plays a wavetable; its Vol stays active, since it sets the wavetable's level
- a side's Oct and Trans when you write its Per, and the envelope Ratio when the period it would derive is written on the step
A column whose cells are dimmed on every step also has its heading dimmed, so you can see at a glance which columns the instrument does not use. The step graphs show the same rows as unused. The parameter matrix shows which parameter is heard in which tone mode and which ones use a sound source the channels share.
Marks. The tone Mode, timer Mode and envelope Shape cells show a small mark beside their number, in the step grid and the step graphs. Hover one to see the setting in full, such as Tone mode: Square drives envelope. The two drive modes also say how they differ from each other, there and in the list of tone modes (see Drive Modes).
- Timer Mode: the cell shows the number you type and a short name:
0 OFF,1 PWM,2 ESY,3 EVMor4 WVT; on an instrument that plays a sample with its notes it shows5 SPLand cannot be changed. The cell's list always shows every mode, and grays out the ones the step cannot use; hover one to see why - On a step whose tone mode uses no envelope (Off or Square Only), an envelope synchronization or envelope volume modulation does nothing, and on a step whose tone mode plays no square (Off or Envelope Only), pulse-width modulation does nothing. The timer Mode cell then shows a warning; hover it to see why
- A drive tone mode (
3or4) with an envelope Ratio of 0 drives nothing and plays as tone mode5. Its tone Mode cell and its Ratio cell are then marked as a warning; hover either to see why. Where the step sets the period that the ratio would derive, or its timer mode leaves the ratio nothing to derive, the Ratio cell stays grayed out, since a ratio would not apply there either, and the warning says what to change instead
Picking a value from a list. In these three cells, and in the Wave cell, a list button appears where the cursor is; click it, or double-click the cell, to pick a value by number, name and mark. The Wave list shows the song's wavetables by number and name. Typing still works, a pick can be undone, and the list closes when you move to another cell. Ctrl+click or middle-click a tone Mode cell to step to the next tone mode.
Collapsing a group. Click a group's name to fold it to a narrow strip, and click the strip to open it again. At least one group always stays open.
- A group no step uses starts collapsed, and opens by itself when a step starts using it
- A group you collapse or open yourself stays that way for that instrument until you click it again or a step starts using it; this is not saved with the song
- The cursor keys skip a collapsed group, but a selection across it still copies, cuts and clears its values
- The Sample group is locked closed while the instrument plays no sample with its notes, since its offsets would have no sample to apply to; the step values are kept
- The Timer group stays open when the instrument plays a sample with its notes, but its timer mode shows
SPLon every step and cannot be changed, since the sample plays on the timer. The Vol and Wave columns are locked and grayed out with it. Per, Oct, Trans and Pitch can still be edited, and they change the speed the sample plays at (see Sample Tab). Choosing no sample brings back the values the steps had
Moving the cursor.
- The arrow keys move between cells; up and down keep the cursor on the same digit
Ctrl+RightandCtrl+Leftmove to the start of the next or previous cell, as in the pattern editor;Ctrl+Leftfirst goes to the start of the current cell. AddShiftto extend the selection by a cellTabandShift+Tabjump to the next group, or to the start of the current or previous group, as they jump between channels in the pattern editorAlt+RightandAlt+Leftjump between groups in the same way; addShiftto extend the selectionCtrl+UpandCtrl+Downscroll the grid up or down by one step without moving the cursor, as in the pattern editor- The mouse wheel scrolls the grid without moving the cursor (Move Cursor with Wheel applies only to the pattern editor)
Backspace deletes the digit left of the cursor and Del the digit under it, as in a text field; repeated presses empty the cell. - switches the sign of the value under the cursor, so you can type a negative transposition or pitch offset, and [ and ] lower and raise it by one.
Copy and paste values. Drag across cells, or hold Shift with the arrow keys, to select a block; Ctrl+A selects every step. Ctrl+C copies the selection, or the cell under the cursor, and Ctrl+V pastes at the cursor, even into another column. Pasted values are limited to the column's range, a column of named choices such as the tone mode accepts only values from the same column, and whole steps paste into their own columns.
Cut to move. Ctrl+X only marks what you cut; pasting moves it, into this instrument or another. Pasting cut whole steps removes them where they were, and the steps below move up; pasting cut values or columns empties those cells. One Ctrl+Z undoes the whole move. Copying or any other edit before you paste drops the cut, as does Escape or Deselect when nothing is selected, and an instrument always keeps at least one step.
Undo shows the edit. Undo and redo go back to the instrument the edit was made to, open the instrument editor if another tab is shown, and put the cursor back on the step and cell you edited, down to the digit, so you see the change. Undoing a run of entries walks the cursor back over them.
After cutting whole steps, Paste Insert Before Cursor and Paste Insert After Cursor on the step grid's right-click menu (see Context Menus) insert them above or below the current step instead of over it; use the second on the last step to add them at the end.
Reverse the steps. Press Ctrl+Shift+R, or choose Reverse Content from the right-click menu, to reverse the order of the step values, so a rising volume falls. With two or more steps selected, only the selected values change; with nothing selected, the whole table is reversed. Choose it again to put them back.
On the Ret (envelope retrigger) column, press R, or any hex digit, to switch the retrigger on or off. The Pause (sample pause) column works the same way with P, and the Fol (follow envelope) column with any hex digit.
Following another channel's envelope. The Fol column, the last of the Envelope group, puts the channel in envelope mode on that step without taking the envelope generator for itself. Its volume then follows whatever envelope the channel that has the generator plays, while its own square and noise sound as the step sets them. So a chord of three squares can be pulsed by one envelope, or a square can be shaped by the buzzer on another channel. The Fol column works in every tone mode; in the envelope modes it only matters while another channel has the generator, which the channel then follows instead of playing at its own volume. The group opens by itself when a step sets it.
Playing a Wavetable
Set a step's timer Mode to 4 (Wavetable, shown as WVT) and type the wavetable's number into the Wave column, the last column of the Timer group, or pick the wavetable by name from the cell's list. The number is the one the wavetable has on the Wavetables tab, 01 to 7F; -- (None in the list) plays none, and the step is silent. Hover over a Wave cell to see the name of the wavetable it plays. An empty Wave cell, or a number the song has no wavetable for, is marked as a warning in this timer mode, since the step is then silent; hover the cell to see what to change. The Wave column is grayed out in any other timer mode.
The wavetable plays at the note's pitch in every tone mode: on its own with tone mode 0, or shaping the square. The timer Oct, Trans, Pitch and Per move it, the step's Vol makes it quieter, and it keeps playing through every following step in wavetable mode. See 8. Sound Generation for details, including the limits of an Atari ST export.
Drawing a Curve
The curve editor lets you draw a slope, such as a fade or a pitch bend, instead of typing it cell by cell. Double-click a cell in the column, in the step grid or the step graphs, or put the cursor in the column and press Ctrl+K, click Draw Curve or choose Draw Curve... from the right-click menu. With steps selected, the last three shape only those steps; otherwise the curve covers every step.
The editor shows the column as a large graph, steps along the bottom and values up the side. Each step's current value stays visible beside the curve's, empty cells count as zero and are marked, and so are the steps the curve will change. Hover over the info icon beside the column's name to read what the column's values mean.
On the square, envelope and timer period columns, the side of the graph also marks the periods that play a note and shows the note's name beside them, as many as there is room for, with the C of every octave first. Hovering a period that plays a note shows the note too, so you can draw a slide that lands exactly on a note.
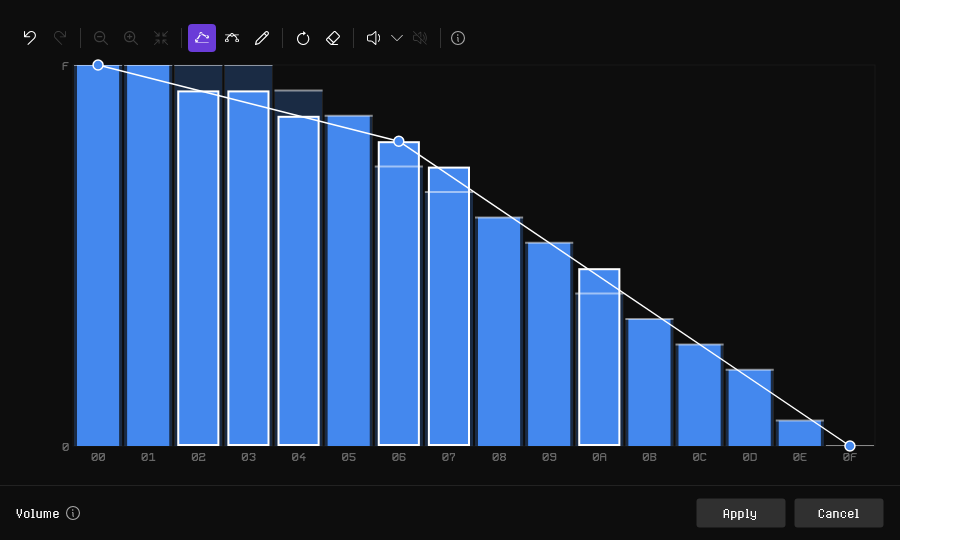
The curve is a line through two or more points. It starts out matching the current values, so you reshape it by dragging the points already there; applying it unchanged changes nothing.
- Click the graph to add a point, and keep the button down to drag it into place
- Drag a point to move it; the first and last points move only up and down, the others not past their neighbors
- Right-click a point to remove it (the first and last always stay), or right-click elsewhere over a step to give that step back its current value
- Hover a point, or anywhere on the graph, to see the step and its exact value
Three tool buttons above the graph choose how you draw, and one of them is always on. Line, on the first time you draw a column, works with points joined by straight lines, as described above. After that the editor remembers the tool you last used on each column, and on each effect in the pattern grid, and opens with it. To draw freehand, click Pen and drag across the steps; each step you pass takes the value under the pointer. Clicking Line again makes the drawing a curve you can adjust by its points.
Smooth Curve joins the same points with curves instead of straight lines. Each point gets two handles that bend the curve on either side of it. Switching to it fits a smooth curve through the values, and the steps keep their exact values until you change it; applying it straight away changes nothing.
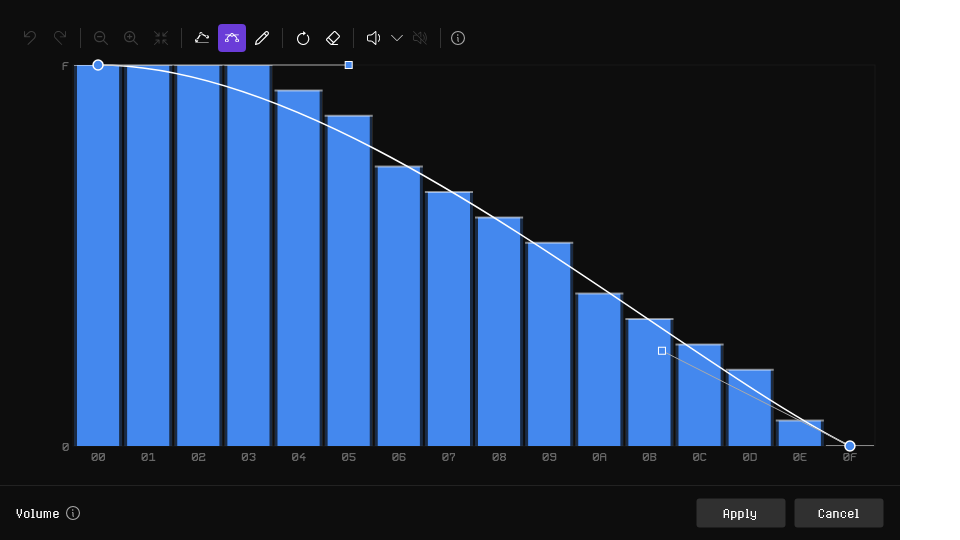
- Drag a handle to bend the curve
- Hold
Shiftwhile dragging a handle to turn the other handle with it, so the curve runs smoothly through the point - Right-click a handle to straighten it again
- Points you add get handles that carry the curve smoothly through them
Clicking Line turns the smooth curve back into straight lines that give every step the same value.
Every step between two points takes the value on the line or curve between them. Reset goes back to the curve that matches the current values, and Clear starts from a flat line at zero.
The mouse wheel scrolls the values up and down and Ctrl+wheel zooms around the pointer; the scrollbar beside the graph and the zoom buttons above it do the same, and the reset zoom button returns to the opening view.
Undo and Redo above the graph, or Ctrl+Z and Ctrl+Shift+Z, step through your edits in the editor; each drag of a point or a handle, Reset and Clear counts as one. Click Apply, or press Enter, to write the curve into the steps as one undoable edit; Cancel, or Escape, closes the editor without changing anything.
You hear the curve as you draw it if the song is playing or a note is held when you open the editor. The piano keys, the octave keys and a MIDI keyboard play the selected instrument without entering notes. Preview Instrument above the graph plays it at its preview pitch, with a looped preview beside it, and Stop Preview stops it without stopping the song. While the curve plays, a line on the graph marks the step being played, whether a preview or the song plays it.
Draw Curve... is unavailable on columns that contain a choice rather than an amount: the tone mode, envelope shape, timer mode, wavetable, retrigger, follow envelope and sample pause.
Step Graphs
The step graphs draw each step parameter as a row across all steps. The Step graphs button at the right of the row of tabs hides and shows them.
Filter Unused Parameters on the toolbar hides the rows of parameters left blank on every step; a value of zero still counts as set. The envelope shape row shows wherever a step sounds the envelope, the volume row wherever a step uses the volume, and the envelope ratio, retrigger, follow envelope and timer mode rows only once they are set to something that has an effect.
Hover a row's label to see what it is. The Mode, timer mode and envelope shape rows show a number or a picture instead of a bar; hover a cell to see its value. In the other rows the height of the bar is the value.
- The step numbers along the top, in hex from 0 as in the step grid, stay in view as you scroll, and the current step is emphasized
- Click a step number to move the cursor to that step; drag across the numbers to select whole steps, or hold Shift and click to extend from the cursor
- Zoom Out, Zoom In and Reset Zoom on the toolbar, or
Ctrl+wheel, make the graphs' text larger or smaller, and their rows and steps with it, as zooming a grid does; scrollbars appear when the graphs no longer fit - Rows are grouped like the step grid (Global, Square, Envelope, Sample, Timer), and selecting a cell in the grid scrolls the graph to it
- Transpositions and pitch offsets go up or down from a zero line
- The steps from the loop start to the end are marked
Alt+clicka cell to set its value to the height you clicked, and keep the button down to draw across steps;Alt+wheelchanges a value,Alt+Shift+wheelin bigger steps- Double-click a row to open the curve editor on it
- Drag across cells to select a block, shared with the step grid; hold
Shiftas you start to extend the selection. Dragging on the labels or empty space scrolls the graph - After selecting in the graph,
Deletedeletes the selected steps andBackspaceclears them, as in the step grid - Right-click for the step grid's context menu, acting on the shared selection
The step graphs and the step grid share the tab's height; drag the divider between them to set the split, or collapse the graphs to hide them.
Parameters Tab
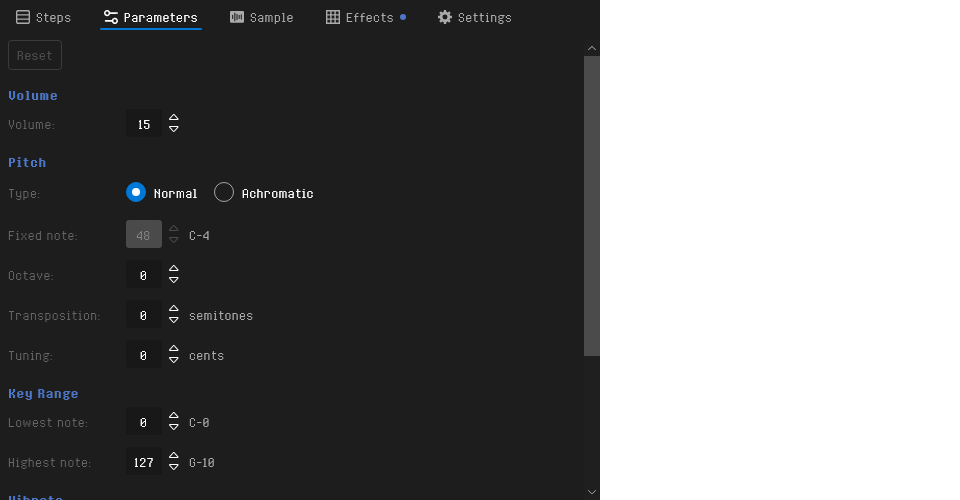
The Parameters tab sets how the instrument responds to what the song plays; each setting applies to every note it plays. In Novice mode the Type and Fixed note rows and the Key Range, Wavetables and Start groups are hidden, and a notice at the top of the tab says so and how to show them; the Wavetables group is also hidden while the song's Wavetables feature is off.
Volume (0 to 15) is the instrument's own level: every step is lowered by however far it is below 15, so you can balance an instrument in the mix without editing its steps. The pattern's volume column lowers it further. It has no effect on a sound played through the hardware envelope.
Under Pitch, Type sets what a played note means. A Normal instrument plays the note it is given; an Achromatic one sounds the same whatever note it gets, as a drum or a hit does.
Fixed note is the pitch an achromatic instrument plays instead, for any part that follows the note (a buzzer, a timer, a tone without a written period). It is grayed out for a normal instrument. A drum whose every step writes its own periods ignores the note anyway.
RhYMe keeps an achromatic instrument's notes in your patterns equal to its fixed note: entering a note writes the fixed note, and changing the fixed note, or making an instrument achromatic, rewrites its existing notes in one undoable step. When the song already plays the instrument, RhYMe asks first, showing the note and how many notes will change. Making it normal again leaves its notes as they are.
An achromatic instrument shows an A badge in the instrument list and dropdown. Transpositions leave its notes alone, and the pattern grid shows them as a cross, which you can turn off under View in the pattern editor toolbar (see Pattern Editor).
Octave (up to four either way) and Transposition (up to twelve semitones either way) move every note the instrument plays, so you can write a bass an octave higher where it reads more easily, for example. The pattern still shows the written notes, and the key range applies to them. Everything that follows the note moves: the square, the envelope, the timer, the arpeggios and a sample that follows the pitch. For an achromatic instrument they move the fixed note.
Tuning shifts the whole instrument by up to a semitone either way, in cents: the square, the envelope and the timer alike. Use it to detune an instrument for a chorus or to match a sample. A period written on a step is not affected.
Key Range, from Lowest note to Highest note, is the range of notes the instrument plays, every note at first. Narrow it for sounds that only work over part of the keyboard. A note outside the range is silent: a key you play shows a warning in the status bar, and a note in a pattern is marked (see Pattern Editor). It sounds again when you widen the range. The range does not apply to an achromatic instrument.
Vibrato gives every note the instrument plays a vibrato, on top of any in the song. Rate and Depth use the scale of the H effect (a depth of 6 moves the square as H46 would), and a depth of 0 is off. Delay waits that many instrument steps before the vibrato starts. The vibrato restarts on every note, and any H or vibrato table in the song adds to it.
Transition, under Wavetables, says what a step that switches to another wavetable does to the one the channel is playing. Continuation, the default and the first in the list, carries the cycle on from the place it had reached, so the switch does not click. Restart begins the new wavetable from its first level. Synchronized lets the old wavetable finish its cycle and begins the new one right after, which waits up to one cycle of the note. In short: Continuation for smooth sweeps through related shapes, at the cost of the new wavetable's beginning; Restart for shapes with a distinct beginning and exact timing, at the risk of a click; Synchronized for distinct shapes each heard whole, at the cost of a switch that can come late on low notes. Hover over a choice in the list, or over the box, for what the mode is good for and what it costs. The group is shown while the song's Wavetables feature is on. See Switching wavetables for the trade-offs in full.
Delay, under Start, waits that many ticks (up to 255) after the row before the instrument plays its first step. Whatever the channel played before keeps playing until then, and stops only when the instrument starts; a channel that played nothing stays silent meanwhile. A pitch slide or glide on the row still moves during the delay, so the instrument starts on the pitch the slide has reached by then. Unlike the vibrato's delay it counts ticks, so the instrument's speed does not change it. Use it for an echo on another channel, or to put a drum just behind the beat. An OFF note or a note cut during the delay stops the instrument from starting and silences the channel, and previews play without the delay.
Sample Tab
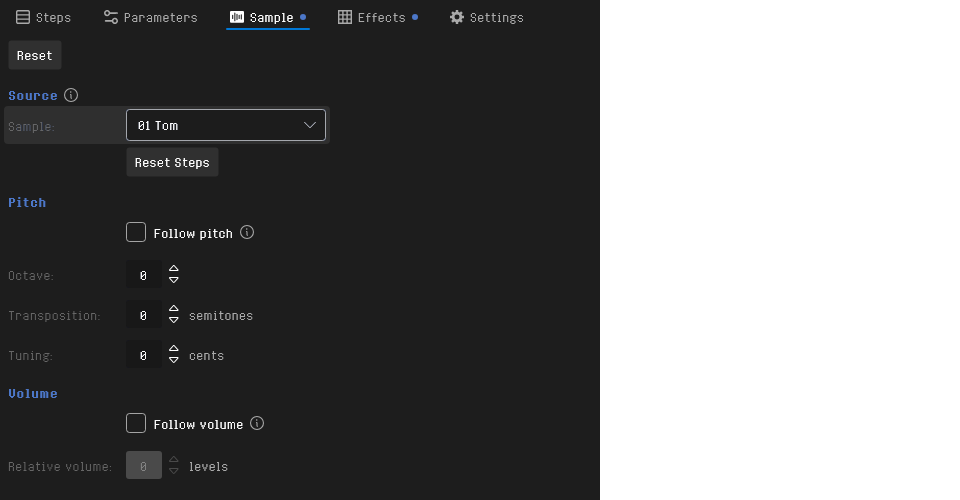
An instrument can play a sample with every note. The Sample tab is shown in Expert mode, and can be opened while the song's Samples feature is checked; otherwise it is dimmed. Choose the sample from the Sample list under Source; None plays no sample.
The sample plays alongside the steps, like a Sample Trigger effect in mode T (Y ending in T, see Samples): the steps' square and noise are heard shaped by it. Set the steps' tone mode to off to hear the sample alone.
Reset Steps replaces the steps with a single step whose tone mode is off and turns the loop off, so only the sample plays. Choosing a sample for a new, untouched instrument does this for you; one undo takes back both.
The sample plays at its own rate unless Follow pitch, in the Pitch group, is checked. It then plays at its own rate on its base note (normally C-4), faster above and slower below, and follows the instrument's pitch changes: arpeggios, slides, vibratos, the steps' octave and transposition, and the instrument's Tuning and vibrato. The effects keep changing its pitch after the steps end.
The sample plays at full volume unless Follow volume, in the Volume group, is checked: the steps' volume, the volume effects and the instrument's Volume then lower it as they lower the steps. Only a sample of up to 4,096 values can follow the volume; with a longer one the box is unavailable, but your choice is kept. If the steps end while the sample plays, it keeps the last step's volume, and the volume effects keep changing it.
Octave, Transposition and Tuning (cents, up to a semitone either way) under Follow pitch move the sample's pitch, on top of the instrument's pitch when it follows it, from the next note on. Relative volume under Follow volume plays a sample that follows the volume that many levels louder or quieter, never above full; it is available only while Follow volume is in effect. These settings can be changed only once a sample is chosen.
Following the pitch or the volume costs the Atari ST more processor time.
Each note with the instrument number starts the sample from the beginning; a note without the number lets it continue. The end of the steps does not stop it, but a note-off does, and so does the next note that starts an instrument on the channel, whether that instrument plays a sample or not. A Y effect on the same row plays its sample instead.
Sample Offset (M) and Sample Retrigger (Z) work only on an instrument's own sample: M moves it to another place, and Z sends it back again and again for a stutter (see Moving Within a Sample and Returning to a Place in a Sample). The sample itself is prepared on the Samples tab.
When the sample ends on a step whose tone mode is off, the level stays where the sample left it, so there is no click; the next step that sounds the square or the envelope sets its own volume.
How a sample starts and ends, and the sample editor's Ramp from and to zero, are described in Samples.
The sample uses one of the song's timers (see Too many timers at once). Because it plays on the timer, the Timer columns of the steps change its speed: Per plays the sample as if at the note with that period, ignoring the note played; Oct and Trans move it by octaves and semitones; and Pitch fine-tunes it, higher for a positive value. They take effect from the step on, so the steps can bend the sample while it plays, and a sample that plays on past the last step keeps the speed the last step gave it. The timer Mode, Vol and Wave columns have no effect on an instrument with a sample. Moving or deleting other samples keeps the instrument on the same sample, and a saved .rhi file includes the sample.
Effects Tab
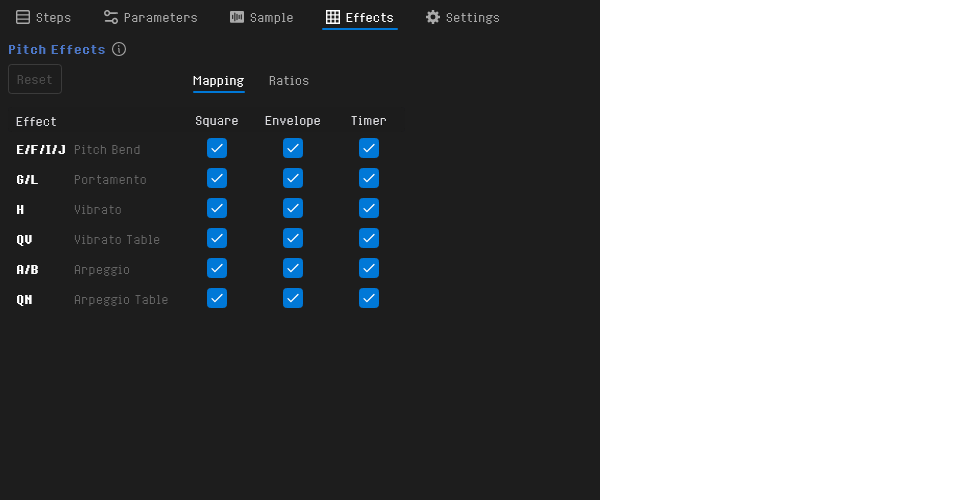
The Effects tab contains the instrument's effect matrix: how the instrument follows the effects that move a note's pitch. It is shown in Expert mode, and can be opened while the song's Effect matrices feature is checked; a new song leaves it unchecked, so the tab is dimmed until you check it under Features in the Song properties.
The grid has a row for each effect: Pitch Bend (E, F, I and J, labeled E/F/I/J), Portamento (G and L, labeled G/L), vibrato H, the vibrato table QV, Arpeggio (A and B) and the Arpeggio Table QN. The table rows are labeled with the letter Q and the effect's mode letter, V or N. It has a column for each pitch they move: Square, Envelope and Timer. The Timer column also covers a sample of the instrument's own that follows the pitch (see Sample Tab). A new instrument follows every effect fully.
Each cell has two values, and the tabs above the grid choose which of them it shows:
| Tab | What it shows |
|---|---|
| Mapping | Each cell's switch: whether that pitch follows the effect at all. Click the box to change it |
| Ratios | Each cell's ratio: how much of the effect it takes, as a percentage. 100 takes all of it, 50 half, 0 none, 200 twice as much, and a negative value moves the other way, up to 999 either way |
Type a ratio and press Enter, or click elsewhere, to keep it; Esc cancels. A cleared cell is 100, ratios other than 100 stand out, and a switched-off cell keeps its ratio, dimmed, for when you switch it back on. Portamento and the arpeggios move to another note rather than by an amount, so their cells have only a switch.
Reset, beside the tabs, puts every cell back as for a new instrument. Every change here, a reset included, can be undone.
A few things to try:
- Switch the Envelope off Pitch Bend and the buzz keeps its pitch while the tone slides, or switch off the Square for the opposite. Give one side a ratio of
300or so for a sound that dives faster than it plays - Switch the Envelope off Arpeggio and the buzzer stays on its note while the square plays the chord; the Arpeggio Table has its own switch
- Switch the Square off portamento and the square jumps to the new note while the buzzer glides
Where the envelope's period comes from the square through the envelope ratio (the envelope Ratio column), the envelope follows the square and its own column has no effect. The timer follows the Timer column in every timer mode, envelope volume modulation included. Under an arpeggio, a slide moves the whole chord, each part of the instrument taking its share of the slide. The envelope follows a portamento by the interval the square glides, so a buzzer tuned to the note lands on the note with the square; it follows a pitch bend and a vibrato by the same count of period units as the square, which on its shorter period is a wider interval. A side playing a period written on its step ignores pitch effects, whatever the matrix is set to.
Settings Tab
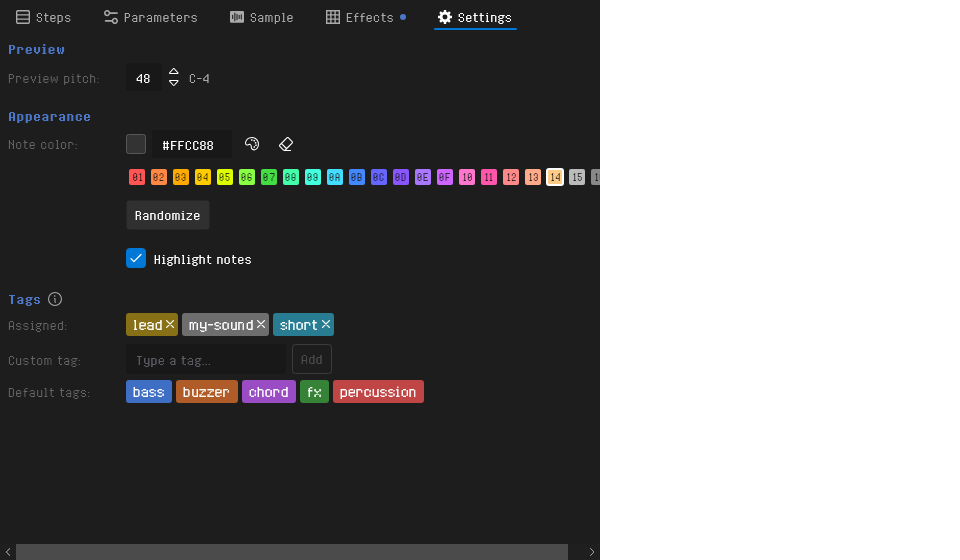
| Setting | Description |
|---|---|
| Preview pitch | The MIDI note (0–127) used for previewing this instrument, shown as a number and a note name (e.g. "48 (C-4)") |
Appearance
How this instrument is shown in the pattern grid. Nothing here affects how it sounds.
| Setting | Description |
|---|---|
| Note color | An optional color (#RRGGBB) for the instrument's notes in the pattern grid, as a background tint or as the text color (see Highlight notes). Pick a numbered swatch, type a hex value, or press the Custom Color button beside it to choose any color in the Custom Color dialog. The same swatches are on the instrument list's right-click menu under Set Instrument Color, and their numbers match the pattern colors |
| Randomize | Pick a random palette color, always a different one from the current color |
| Highlight notes | Checked (the default), the color tints the cell background; unchecked, it colors the note and instrument number. The instrument lists show the same choice: checked fills the box around the instrument number with the color, unchecked writes the number itself in the color. Available once a color is set |
Tags
Tags are short words that describe an instrument, such as bass, lead or percussion, so you can find it again in the instrument browser. An instrument can have as many tags as you like, each once. Tags are saved with the song and in instrument files, and are always listed in alphabetical order.
| Setting | Description |
|---|---|
| Assigned | The instrument's tags. Click the cross beside a tag to remove it |
| Custom tag | Type a new tag and press Enter or Add. It is added in lower case. If it cannot be added, a warning icon appears; hover over it to see why |
| Default tags | The ready-made tags the instrument does not have yet. Click one to add it |
A tag uses lower-case letters, digits and dashes, starts with a letter and is at most 24 characters long, for example acid-bass or lead2. The default tags are bass, buzzer, chord, fx, lead, percussion and short. Adding and removing a tag can be undone.