Samples
RhYMe supports digitized sample playback through the YM2149's volume DAC. Samples are stored in the song's sample bank and played via the MFP timer, either triggered from a pattern with the Y effect or played by an instrument that plays a sample with its notes (see Sample Tab). Samples are not the same as wavetables, the short drawn waveforms an instrument step can play; those have a separate tab (see 13. Wavetables).
How Sample Playback Works
Sample playback uses the MFP timer to write 4-bit volume values from PCM data to a channel's volume register at audio rate. On the Atari ST, 4-bit samples played by the YM2149 like this are historically called digidrums or digisound.
A sample without a loop plays to its end, and a looping sample plays on until something else on its channel stops it. When the song goes back to its loop point, a sample still playing stops there, as it does on the Atari ST, unless the first row of the loop starts a sample.
RhYMe keeps imported samples non-destructive — the original file is kept unchanged until you choose to remove it. Importing a file creates three layers of waveform data:
- Original file — the imported file exactly as it was, so you can export the original file again. To save space in the song file you can remove it (see Original File). A file larger than 64 MB (about six minutes of CD-quality stereo) is imported like any other, but its original is not kept, since it would make the song file too large to open again.
- 8-bit mono PCM — decoded from the imported file at the original sample rate. This is the source data shown in the waveform graph.
- Processed PCM — the result of applying cropping, the pitch, resampling, the equalizer and gain to the mono PCM. This is what the engine actually plays. It is regenerated automatically whenever you change a sample property.
When the resample rate (with the pitch applied) is lower than the original sample rate, RhYMe first filters out the frequencies the lower rate cannot reproduce. Without that step they would fold back into the audible range, and hi-hats, cymbals and the noise of a snare would come out with a metallic grit and tones that are not in the recording. This filtering is part of the sample's equalizer: choose its Off preset when you want that brighter, grittier sound. Because the filtering is part of the processed PCM, the exported songs sound the same as playback in RhYMe.
At output, the 8-bit PCM data is turned into the chip's sixteen volume levels, which grow louder in ever bigger steps, matching the effective 4-bit resolution of the YM2149's DAC.
Silence in a sample is a level near the middle of the chip's range, not zero, so cutting a sample off at once would be heard as a click. When a sample is cut off, by a released preview key, a mute or Stop, or when a sample or a one-shot sample runs out, RhYMe brings the channel's level down to silence gradually instead, over a few frames at most. The exported Atari ST player cuts at the frame, as the machine does.
The start of a sample has the same step the other way: the channel jumps from silence to the sample's middle level on its first value, which is heard as a click, in RhYMe and on the Atari ST alike. Check Ramp from and to zero in the sample editor to fade the sample in from silence over its first 2 ms and, unless it loops, out to silence over its last 2 ms. The fade is part of the sample's data, so the exported tunes play it too. See Properties.
Sample List

The sample list appears when the Samples tab is selected. Each item shows:
- Hex index (
01h–7Fh, first sample is01h), shown in the sample's color when it has one - Sample name
- Sample rate (the resample rate, e.g. "8084 Hz")
The list starts with a fixed 00 OFF entry. You can't edit, reorder, or delete it, but you can select it to hide the editor and show that no sample is chosen. While OFF is selected there is nothing to play, so previewing it stops whatever preview is running and leaves silence.
Multiple samples can be selected with Ctrl+click and Shift+click. Selected samples can be reordered by dragging one of them to a new position: they all move, gathered together in list order where you let go, and the instruments and Y effects that use them are renumbered to match.
While the sample list has keyboard focus, you can play the selected sample at different pitches using the QWERTY piano keys (lower octave Z–M, upper octave Q–U).
Samples that nothing plays, neither an instrument nor a Y (Sample Trigger) effect, are dimmed in the list.
The sample the currently selected instrument plays is marked in the corner of its number, the same mark the pattern editor puts on the rows that play that instrument. The mark follows the selected instrument. Hover over the mark to see what it means.
While the song plays, the samples you can hear are highlighted in the list, so you can see which sample each channel plays. A sample is highlighted only while it is actually playing, and never on a muted channel. Turn the highlights off with View > Highlight Playing Items, which also applies to the instrument, arpeggio, vibrato and wavetable lists.
Toolbar
| Button | Description |
|---|---|
| Import WAV | Open a file dialog to import one or more .wav files as new samples appended to the bank |
| Open File | Open a file dialog for one or more RhYMe sample (.rhw) files and add each to the bank as a new sample, preserving all its metadata (Ctrl+Alt+L) |
| Duplicate Sample | Add a copy of the selected sample, with its audio and settings, at the end of the list (Ctrl+D) |
| Delete Sample | Remove the selected sample(s) from the song. References in instruments and the Y (Sample Trigger) effect are updated automatically. If the song uses any of them, you are asked to confirm first. Delete in the list does the same and keeps the focus there on the sample below, so you can press it again |
| Select All | Select every sample |
| Select Unused | Select all samples no instrument or Y effect uses. Replace, export, load-and-replace, and save are on the right-click menu |
| Preview Sample | Play the selected sample at its base note. A sample without a loop plays once; one with a loop plays until you stop it |
| Preview ▾ | Menu with Preview Sample and Preview Sample Looped, which plays the sample until you stop it (Alt+/) |
| Stop Preview | Stop the preview that is playing, whichever tab started it. Available only while something is playing. See 5. Main Window |
Preview Sample Looped plays the sample's own loop if it has one, and otherwise starts it again from the beginning. The loop is the preview's alone: the sample's own loop setting does not change. While a preview repeats, whether you asked for it looped or the sample has a loop, any change you make to the sample starts it again, so you hear each change as you make it, also while you drag a slider. The same menu is next to the Preview Sample button above the waveform in the sample editor.
Context Menu
Right-clicking a sample opens a context menu with Replace with .rhw File..., Replace with .wav File..., Save As .rhw..., Export Original .wav..., Export 8-bit .wav..., Duplicate, Delete, Optimize and Set Sample Color. They are described under Sample List in the context menu chapter.
Importing Samples
The Import WAV button opens a file dialog for .wav files. You can choose several files at once: each becomes a new sample, in the order they are listed, and one undo removes them all again. If a file cannot be imported, RhYMe tells you which one and why, and imports the rest. Once the bank is full, the remaining files are left out. Long recordings take a moment to convert; while they do, the window is dimmed and a spinner turns in its middle. A WAV file must be:
- PCM or IEEE float format (8, 16, 24, or 32-bit)
- Any number of channels (mixed to mono on import)
A sample plays from up to 64 KB of data. Since RhYMe resamples what you import to the sample's playback rate, a recording can be much longer than that. Whatever the sample could never play is dropped when the file is read.
To replace a sample's audio, right-click it and choose Replace with .wav File... to import a WAV, or Replace with .rhw File... to load audio from a .rhw file. The slot keeps its name, color and settings: gain, resample rate, pitch, start and end markers, equalizer, loop, ramp and volume copy limit. Instruments and patterns that use the slot play the replacement with those settings.
Sample Editor
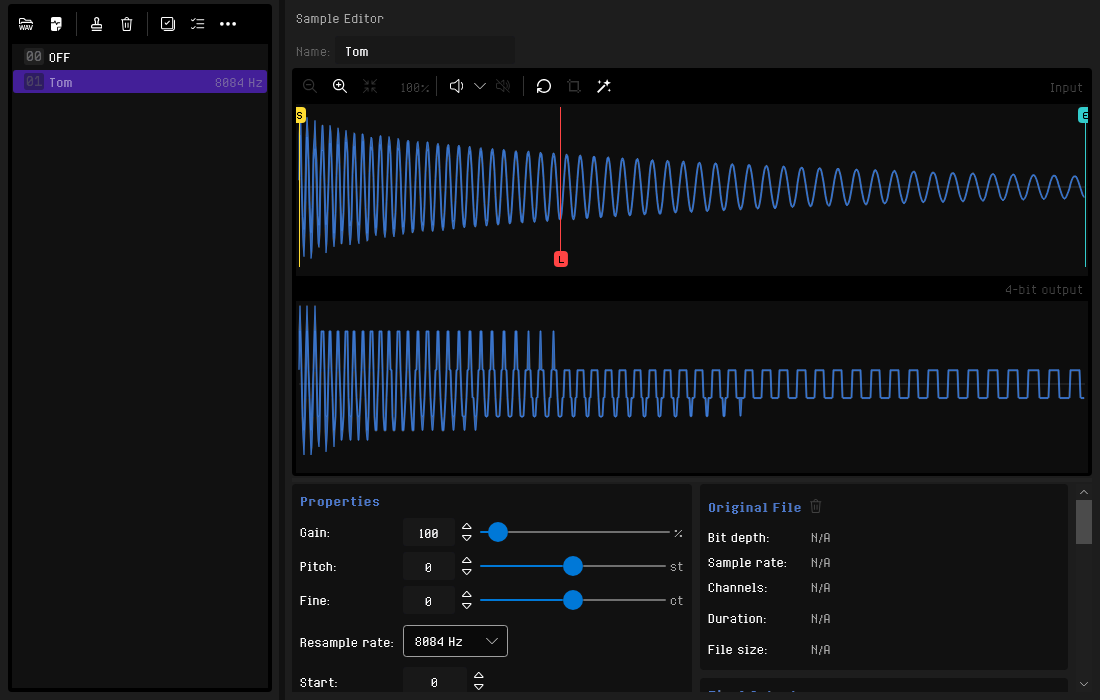
When a sample is selected, the right panel shows a Name field (up to 64 characters) at the top, the input and output waveforms right below it, and then the Properties, Equalizer and Appearance panels and the information panels.
Properties (Left Panel)
Editable controls for processing the sample:
| Property | Description |
|---|---|
| Gain | Amplification multiplier from 0% to 2000%. Values above 100% overdrive the signal for a punchier sound |
| Pitch | Raises or lowers the sample by whole semitones, from −48 to +48, while it still plays at the resample rate |
| Fine | Fine-tunes the pitch in cents, from −100 to +100 |
| Resample rate | Target playback rate in Hz, chosen from a list of the rates the Atari ST's timer can play, from 2400 to 16605 Hz. A newly imported sample starts at the Resample rate on the Defaults tab of General Settings, 8084 Hz unless you change it. The processed PCM is resampled to this target rate |
| Start | The point at which playback begins. 0 plays from the beginning; a higher value trims the leading part of the sample. The start marker can also be dragged directly on the waveform graph |
| End | The point at which playback stops. Setting it to the sample length plays the full sample. For a looping sample this is also where the loop ends. The end marker can also be dragged directly on the waveform graph |
| Loop from | Check the box to make the sample loop: at End it jumps back to this point and repeats that stretch until the channel moves on. Clearing it stops the loop and keeps the value. The loop start stays between Start and End, moving along with them, and can also be dragged on the waveform graph |
| Ramp from and to zero | Check the box to fade the sample in from the chip's silence over its first 2 ms and out to it over its last 2 ms, so it neither starts nor ends with a click, in RhYMe and in the exported tunes. A sample with a sharp attack loses a little of it. A looping sample fades in only before its loop start, so the loop never repeats the fade, and does not fade out, since it repeats rather than ends. Off for a new sample |
Equalizer
The Equalizer panel below the properties shapes the sound of the sample. Set each band with its box or its slider:
| Setting | Description |
|---|---|
| Preset | Ready-made settings of the whole equalizer. Low-pass only filters out what a lower resample rate cannot reproduce, as a new sample does; Off does not filter at all. Warm, Bright, Bass boost, Presence and Telephone shape the sound as their names say, with the low-pass on. Changing a setting below shows Custom |
| Low | Raises or lowers everything below its frequency, from −12 dB to +12 dB. The frequency is 40 to 1000 Hz |
| Mid | Raises or lowers the frequencies around its frequency, from −12 dB to +12 dB. The frequency is 200 to 6000 Hz |
| High | Raises or lowers everything above its frequency, from −12 dB to +12 dB. The frequency is 1000 to 8000 Hz |
Only the preset turns the low-pass filtering on or off: when you change a band after choosing Off, the sample stays unfiltered. The frequencies are those of the sample as it plays at its resample rate. A band raised far enough overdrives the sample, as a high gain does. Each change can be undone, and choosing a preset is one step to undo. The 4-bit output waveform shows the result as you change the settings.
To give another sample the same equalizer, press the Copy button beside the panel's title, select the other sample and press Paste. Paste sets the preset and all three bands at once, and one undo puts back the sample's previous equalizer.
Appearance
In the Appearance panel below the equalizer you can give the sample a Color, which changes only how the sample is shown, never how it sounds. Pick a numbered swatch, type a hex value (#RRGGBB), or press the Custom Color button beside it to choose any color in the Custom Color dialog, or click Randomize for a random swatch. The sample list then shows the sample's number in this color, and the pattern editor marks every Y (Sample Trigger) effect that plays the sample in it, so you can tell your drums apart at a glance. The same swatches are on the sample list's right-click menu under Set Sample Color. The color is saved with the song and in .rhw files.
A setting with a slider follows the slider while you drag it, and the whole drag is one step to undo, however far you dragged: undo puts back the value from before the drag. A value typed into its box is a separate step.
The Reset button, left of Crop, undoes your changes to the sound settings in one click: the whole sample plays again at a gain of 100%, without pitch shift, at the default resample rate from the General Settings, with the Low-pass equalizer preset and without the ramp from and to zero. The loop, name, color and volume copy settings are kept, and one undo restores the previous settings.
The Crop button above the waveform graph permanently discards the audio outside the Start/End range. Start and End then mark the beginning and end of the shortened sample, so it sounds the same as before, and looping stays on. The button is available only when the range is narrower than the whole sample, and cropping can be undone.
Warning
Cropping removes the discarded audio from the sample for good, unlike moving the Start and End markers. Use Undo right away if you crop by mistake.
The Optimize button next to Crop sets the sample up to sound its best on the YM2149 in one click. It listens only to the part between Start and End and changes these settings, which you can then adjust further:
- Start and End move inward past the quiet beginning and end of the sample. A looping sample keeps its End and its loop.
- Gain is raised a lot, typically to between 400% and 1500%, and more for a quiet sample than for a loud one. Much of the sample is overdriven, which makes it punchier and easier to recognize on the chip.
- Resample rate is lowered to the lowest rate that still keeps nearly all of the sound, so the sample takes less space. It stays at or below 8 kHz unless the sound has a lot of high frequencies, and never goes above 10 kHz. A little quality may be lost.
- The equalizer's low-pass filtering is turned on where it removes metallic grit from a tonal sound, and off for noisy sounds such as snares and hi-hats, which sound brighter without it.
- The equalizer's bands are set flat, except where a band helps: Low is lowered for a sample whose booming low end would cover its detail on the chip, and High is raised a little for a tonal sample that would sound dull at its new resample rate.
- Ramp from and to zero is turned on where the sample would otherwise start or end with a click, and left off for a sample with a sharp attack.
The audio itself is not changed, and one undo restores all the previous settings. To optimize several samples at once, select them in the sample list, right-click one of them and choose Optimize. You can carry on working while they are analyzed; a sample you change before the analysis finishes keeps your change.
Original File (Right Panel, Top)
Shown while the sample still has the file it was imported from: its bit depth, sample rate, channels, duration and size. The delete button beside the title removes the file from the song to save space; the sample plays as before, but Export Original .wav... is then no longer available.
Final Output (Right Panel, Bottom)
The size and duration of the sample as it plays, after cropping and resampling.
Waveform Graph
Below the name, the editor shows two waveforms. The upper one, Input, shows the whole sample as it was imported, with the start and end markers over it; none of the settings change it. The lower one, 4-bit output, shows what the YM2149 plays: the sample with every setting applied (gain, pitch, resample rate, equalizer and the ramp from and to zero), at the chip's sixteen volume levels. Watch it to see what a setting does to the sound. Drag the line below the waveforms up or down to make them smaller or larger, and double-click it to return them to their default size. On the upper waveform:
- Position markers have lettered handles: S (start), L (loop start, shown only while the sample loops) and E (end)
- Drag a marker handle to move it. The properties panel follows as you drag, and one undo puts the marker back
- Zoom Out and Zoom In, or
Ctrl+wheelat the pointer, change the zoom level, shown as a percentage beside the buttons;Shift+wheelpans a zoomed view, and Reset Zoom shows the whole sample again - Click and drag an empty area to pan when zoomed in
Triggering Samples Directly (Y Effect)
You don't need to build an instrument to play a sample. The Sample Trigger effect (Y) plays a sample straight from a pattern row, independently of whatever instrument the channel is using. A sample played this way is called an effect sample, to tell it apart from a sample an instrument plays with its notes.
To use it, type the effect into one of a row's effect slots in the pattern editor:
- The letter right after the
Yis the mode, which sets what happens to the note playing on the channel:Xends it,Mmutes it while the sample plays, andTplays the sample through it. Each is described below. To change the mode, move the cursor to the second place of the effect, right after theY, and typeX,MorT; a hex digit typed there does nothing. The cursor then moves on to the first digit, unless it moves to the next row (see Mode Letters). - The two hex digits after the mode are the sample's hex index from the sample list (
01h–7Fh).
For example, YX01 plays the first sample in the bank, and YM0A plays the tenth over the note without ending it.
When a sample is triggered in mode X or M, the channel is switched to play the sample cleanly:
- The square tone, noise, and the shared hardware envelope are turned off on that channel, so the sample is not colored by whatever sound was previously playing there.
- Because the hardware envelope is left untouched, the sample does not disturb any hardware-envelope sounds playing on the other two channels.
- The sample plays at its own resample rate (the rate shown in the sample editor), regardless of the note on the row, and at full volume.
In mode X the sample takes the channel. The note that was playing ends where the sample starts, just as it would on an OFF, and the channel falls silent once the sample runs out. To carry on after the sample, put a note on a later row: a note without an instrument plays the instrument the sample ended, from its first step.
A note on a later row takes the channel back, even before the sample has finished: the sample stops where the note begins, and the note starts cleanly on its own first step. So a kick can be on the row above a note without the two running into one another.
In mode M the sample mutes the note instead of ending it. The note's instrument pauses where it is while the sample plays, and the note carries on from there from the tick after the sample finishes. There is a short gap between the end of the sample and the note coming back.
In mode T the sample plays through the note: the note's square and noise keep sounding, shaped by the sample's volume, and the note sounds on its own again from the tick after the sample finishes. A step that uses the hardware envelope is heard without it while the sample plays, and with a step whose tone mode is off, the sample sounds as a clean sample.
No volume control
A sample played with Y always plays at full volume: volume effects and instrument volumes do not change it. To make it quieter, lower its Gain in the sample editor.
In modes M and T the sample keeps the channel until the sample finishes: notes on later rows play underneath it, just as the note it was triggered over does. The instrument's own timer effect, such as a PWM or a wavetable, waits for the sample and starts again once the note has the channel back.
The Sample Trigger effect fires once on the row where it is written; it does not carry over to later rows. See the Complete Effect Reference for the full list of effects.
Moving Within a Sample (M Effect)
The Sample Offset effect (M) moves the instrument's own sample, the one chosen on its Sample tab, playing on a channel to another place in it, and the sample plays on from there. A sample Y plays is not moved. Its three hex digits give the place:
- The digits always spread over the whole sample, however long it is:
M000is the start,MFFFthe last byte, andM800about half way through. - The longer the sample, the further apart the places you can reach; in a short sample several values reach the same place.
Earlier versions treated the digits as the byte itself in a sample of up to 4096 bytes. A song or instrument saved by such a version has its M effects and Ofs values on those samples converted when it is opened, so it plays as before.
On the row of the note that starts the sample, it starts the sample at that place. On a later row, it jumps the playing sample there, to repeat a part or skip ahead. A sample that has already finished is not started again: play a new note for that. The effect fires once, on its own row.
The instrument's steps can make the same move themselves. The step grid's Sample group, open while the instrument plays a sample with its notes, has two columns. In Ofs, a step with a place in it moves the sample there each time the instrument reaches that step, read the same way as M. A place on the first step starts every note's sample there, and places on a looping run of steps cut the sample into slices that play in the order the steps give, at the instrument's speed. If the sample has already run out, a step with a place starts it again from there, so a looping instrument comes back to its sample on every pass however short the sample is. --- lets the sample play on. Where an M effect and a step move the sample at the same moment, the effect wins.
The Pause column pauses the sample. A step with P in it silences the sample when the instrument reaches it, and it stays silent through the steps that also have P. The next step without the pause plays the sample on from where it stopped, or from its place in Ofs if it has one. A place on the paused step itself is ignored. A new note or an OFF ends the paused sample, as it ends a playing one.
Returning to a Place in a Sample (Z Effect)
The Sample Retrigger effect (Z) sends the instrument's own sample, the one chosen on its Sample tab, playing on a channel back to the place it had reached on the effect's row, over and over, so a slice of the sample repeats: a stutter. A sample Y plays is not returned. Its three hex digits are xxy:
xxis how many ticks pass before each time the sample goes back, counting the first from the effect's row.yis how many times it goes back before it plays on, andFkeeps it going back until a reset (RS).Z021replays the row's first two ticks once;Z01Fkeeps the sample on its first tick's slice until a reset.
The repeats continue across the rows below until they are done, a reset stops them, a new note starts a sample, or another Z takes over; in Non-trailing effects mode they stop at the end of the row. On the row of the note that starts the sample, the place is where the sample starts, or where an M on that row puts it. A sample that has already finished is not started again.