Pattern Editor
The pattern editor is where you compose music — entering notes, selecting instruments, and programming effects. It occupies the left column of the main window.
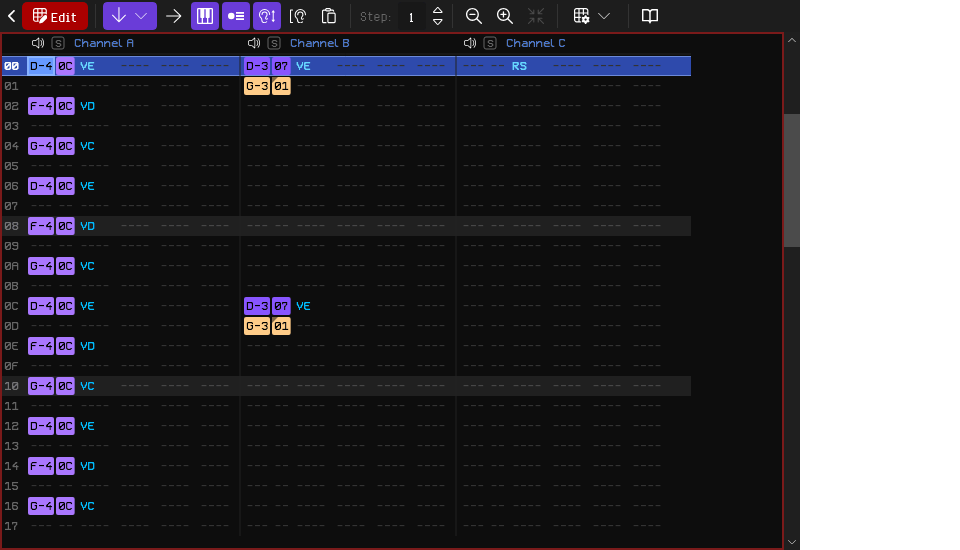
Novice mode
Novice mode hides grid zoom, the advanced toolbar toggles (among them Auto-instrument, Auto-cursor advance and Record OFF notes), Cross Out Achromatic Notes and the less common right-click items, whose shortcuts still work. The hidden toggles keep their settings. The effects Q, Y, M and Z cannot be typed. See Experience Level.
Pattern Grid
Each pattern contains three tracks, one per YM2149 channel (A, B, C). Each track is a column of rows, and each row contains:
<note> <instrument> <effect1> ... <effectN>
Example: D#4 03 E010 U004 ----
| Field | Format | Description |
|---|---|---|
| Note | 3 characters, e.g. C-4, D#3, ---, === |
The note. --- means no note; === is an OFF note (silences the channel) |
| Instrument | 2 hex digits, 01h–FFh or -- |
The instrument number. -- means none is written: a note there plays legato, on the instrument the channel already has |
| Effect | 1 letter + 0 to 3 hex digits, or ---- |
An effect command. Up to 5 effect slots per row (configurable) |
Hover over a cell for a tooltip. Over a note or instrument number it shows the row's instrument, and over an OFF note it says that the row silences the channel. Over an effect it shows the effect's name and syntax as the Tracker Effect Reference lists it, for example Arpeggio (Axy-), and what it does. Over an arpeggio or vibrato table effect (QNnn, QVnn) it also shows the table's name or number, or (Off) for 00, which stops the table. Over a sample trigger effect (Ymnn) it also shows the name or number of the sample it plays.
Entering a note for an achromatic instrument writes that instrument's fixed note rather than the key you pressed, since that is what will sound (see Instrument Editor).
A note played by an achromatic instrument is drawn as a cross (-x-), since that instrument sounds at its own pitch whatever note it is given. The instrument counted is the one on the row, or the last one above it in the same channel. The note is still written, edited and saved as usual; turn off Cross Out Achromatic Notes under View Options in the toolbar to see it.
Channel Headers
Each channel header shows the channel label (A, B or C), a mute button and a solo button marked S. Click the label to select the whole track, Ctrl+click other labels to add their tracks to the selection or take them out, or drag from it across the header to select just those columns; click the mute button to silence the channel.
Click a channel's solo button, Ctrl+click its mute button, or press Alt+Shift+Z, Alt+Shift+X or Alt+Shift+C to hear that channel on its own. Only one channel can be soloed at a time. The channels left out are dimmed like muted ones, but their mute buttons keep your mutes, which come back when you take the solo off. Soloing a muted channel unmutes it; muting the soloed channel, or muting or unmuting all channels, takes the solo off. The solo is not saved with the song.
Muting a channel, or leaving it out with a solo, silences it at once but without a thump.
Double-click an instrument number to make it the current instrument and show it in the instrument editor. The cursor and the keyboard stay in the grid, so you can carry on typing. Edit Instrument on the right-click menu of a note or instrument number does the same.
Double-click a note to hear it with the instrument and volume in force at that row; it stops on its own, and the cursor stays where you clicked. An empty cell or an OFF note has nothing to play.
Double-click an effect such as a volume or a pitch slide to draw a curve of it across the whole track (see Drawing an Effect Curve).
Ctrl+double-click a row to play the song from that row, or Alt+double-click it to play just the pattern from that row, looping it. This works anywhere on the row, and instead of what the double click would otherwise do there. A pattern that is not in the song plays from its first row.
From the keyboard, Alt+/ (either Alt key) does the same for the note on the cursor's row and channel, whichever field the cursor is in. Anywhere else in the window it plays the selected instrument looped (see Looped Previews), or on the Samples tab the selected sample looped.
Rows playing the instrument you are editing are marked on their instrument number, so you can see where it is used at a glance. The marks follow the selected instrument and leave out muted channels and channels a solo leaves out. Hover over a mark to see what it means. Turn off Mark Current Instrument on the toolbar's View Options dropdown to hide them; RhYMe remembers the choice.
Scrolling
While part of the pattern is selected or waiting to be pasted after a cut, the vertical scrollbar marks where it is, so you can find it again after scrolling it out of view.
For the look of a classic tracker, turn on Enlarge Center Row on the toolbar's View Options dropdown. With Center Scroll during Playback on, the row being followed is then shown twice as tall: the playing row, kept in the middle of the grid while the song plays, or the cursor row while it is stopped or paused. RhYMe remembers the choice.
While you drag out a selection, holding the pointer near the top or bottom edge of the grid scrolls it, so the selection can reach rows out of view.
Instrument Colors
An instrument can be given a color under Appearance on the instrument editor's Settings tab (see Instrument Editor). The note and instrument fields of its rows are then tinted with it, so you can see which instrument plays where. Highlight notes beside it chooses how: checked (the default) tints the cell background, unchecked colors the text. Instruments from an imported Arkos Tracker 3 song start unchecked.
A sample can be given a color too, under Appearance in the sample editor (see Samples). Every Y (Sample Trigger) effect that plays the sample is then marked in that color, so you can see which sample plays where.
Oscilloscopes
Above the pattern editor toolbar is a row of four oscilloscopes: one for each channel, A, B and C, and one, set apart, for the mixed output that goes to your speakers. Each shows its sound as a moving waveform, so you can see what each channel contributes while the song plays. They show the chip's own output, before the filtering that shapes the finished sound.
The oscilloscopes share the width of the pattern editor. Drag the divider between them and the toolbar to make them taller or shorter. They stop at their smallest height; keep dragging up past it to hide them, or back down to keep them. Show Oscilloscopes in the View menu brings hidden oscilloscopes back at the height they had. The height is remembered between sessions, and Reset Layout in the View menu restores it.
The mixed oscilloscope fills up when all three channels play loudly, so you can see how much of the output each channel accounts for.
To see which frequencies the mix contains instead, right-click the strip and choose Mix Display > Spectrum. The mixed oscilloscope then shows a bar for each frequency band, from the deepest bass on the left to the highest treble on the right. The bars change color as they rise, so you can tell how loud each band is at a glance. Above each bar a marker shows the highest level it reached a moment ago before dropping back, gathering speed as it falls, and rests along the bottom while the band is silent. Choose Mix Display > Waveform to return to the waveform. The choice applies to the oscilloscopes above the playlist too, and is remembered between sessions.
Right-click the strip for a menu to mute or solo each channel, mute or unmute all three, choose what the mixed oscilloscope shows, or Hide Oscilloscopes (see Context Menus).
Click a channel's oscilloscope to mute or unmute it, as Alt+Z, Alt+X and Alt+C do, or Ctrl+click it to solo the channel. Click the mixed oscilloscope, or press Alt+0, to silence all three channels, and again to bring them back; if one is already muted, the first click silences the rest. Collapsing the pattern editor puts the oscilloscopes away with it.
Pattern Toolbar

The instrument selector, the octave stepper and the instrument and note previewing controls live on the main toolbar, and the toggles that only concern a MIDI keyboard on the MIDI toolbar below the grid. The pattern editor toolbar is between the oscilloscopes and the grid and provides these controls:
| Control | Description |
|---|---|
| Collapse toggle | Collapses/expands the pattern editor panel horizontally, freeing width for the middle and right columns |
| Edit Mode toggle | Enables/disables typing into the grid. Toggle with Enter. Hidden when Always stay in Edit Mode is turned on in General Settings |
| Step: n | Edit step — how many rows the cursor advances after each entry when Auto-cursor advance is set to Advance by Edit Step (0–16) |
| Zoom Out / Zoom In | Change the grid's font size, as Ctrl+wheel over the grid does |
| Reset Zoom | Put the grid's font size back to the default |
| View Options | Toggle Follow Playback, Center Scroll during Playback, Scroll Past Edges, Move Cursor with Wheel, Mark Current Instrument, Cross Out Achromatic Notes, and Enlarge Center Row |
| Auto-instrument | Toggles whether entering a note also writes the selected instrument (keyboard and MIDI); also Ctrl+I |
| Auto-cursor advance | Chooses where the cursor moves after you enter a note, instrument number or effect: nowhere (Off), one row, by the edit step, or to the next filled cell. See Edit Step below |
| Stay on row in effect columns | When on, typing an effect keeps the cursor on its row, so you can type the letter and every digit in place, while notes and instrument numbers still advance. Off by default |
| Record OFF notes | When on (the default), releasing a note key during live recording writes an OFF note (===), so notes last as long as their keys were held. See Recording OFF Notes |
| Preview note on change | When on (the default), changing a note by keyboard, by transposing it or changing its instrument, plays a short preview of the note as it now sounds. Turn it off to change notes silently |
| Preview notes with effect context | When on, a note you play into the pattern is previewed with the effects in force on its row, including those still running from earlier rows when effects trail. Volume, slides, arpeggios and their speed, vibrato, instrument speed, transpose and reset are played; portamento, speed, pattern break and sample trigger are not. Also applies when you transpose a note, change its instrument or double-click it. Off by default |
| Move cursor below paste | When on, every paste moves the edit cursor to the row below the pasted rows, even a Paste Overlay or Paste Underlay that changes nothing, spaced out by the Step where that is above 1 (only while Auto-cursor advance is set to Advance by Edit Step), so you can stack blocks with repeated pastes. Off by default, only Paste and Advance (Ctrl+Shift+V) does that |
| Tracker Effect Reference | Opens the Tracker Effect Reference window; also Ctrl+Shift+E |
| Warnings | Lists what RhYMe has found worth looking at in the song; shown only when there is something. See Warnings |
The toggles other than Edit Mode, and the view options, are remembered across sessions.
The collapse toggle at the left edge of the toolbar, or Ctrl+P from anywhere, narrows the pattern editor to a thin strip, hiding the oscilloscopes, the grid and its toolbars, so the middle and right columns get the width. Click the strip to expand it again. The state is saved across sessions.
MIDI Toolbar

Below the pattern grid, the MIDI toolbar gathers the toggles that only work with a MIDI keyboard. It appears only while a MIDI device is active (see MIDI Settings). Each toggle's state is remembered across sessions.
| Toggle | Default | Description |
|---|---|---|
| MIDI note input | On | Whether the notes you play on your MIDI keyboard are heard and entered. Turn it off to silence the keyboard without disconnecting it: its notes are then neither previewed nor written anywhere |
| Resume held note on release | On | Letting go of one of several held MIDI keys drops back to the one you pressed before it instead of falling silent. See MIDI Input |
| Enter chords as arpeggios | Off | A chord you play is entered as its lowest note with an inline arpeggio through the other keys; also Ctrl+J. See Entering chords as arpeggios |
MIDI note input and Enter chords as arpeggios are always shown with the MIDI toolbar; Resume held note on release is an advanced option, hidden in Novice mode.
Entering Notes
When Edit Mode is active (press Enter), notes are entered using the QWERTY keyboard mapped to a two-octave piano layout:
Row 1 (sharps/blacks)    2  3     5  6  7
Row 2 (naturals)       Q  W  E  R  T  Y  U
Row 3 (second octave)      S  D     G  H  J
Row 4                    Z  X  C  V  B  N  M
The mapping uses physical key positions, so it works the same on AZERTY, QWERTZ and QWERTY keyboards. The lower rows play the octave shown as Oct: n on the main toolbar, the upper rows the octave above; see Changing Octaves for the keys that change it.
Holding several note keys at once
With Polyphonic previewing on, held note keys sound together, up to three. Many computer keyboards cannot report every combination of keys at once, so a chord may lose a note; try another fingering or a MIDI keyboard.
With Auto-instrument on (the default, Ctrl+I), each note you enter also writes the selected instrument; with it off, only the note is written. Hold Shift while pressing a note key to flip this for one note: with the toggle on, that enters a note without an instrument (legato).
To silence the channel, enter an OFF note (===) with Shift+O on the note or instrument field; on an effect's letter it types the effect O instead, and on its digits it does nothing. Like a note, it needs Edit Mode and advances the cursor. With the OFF instrument selected, the note keys write OFF notes too, whenever a note would also write its instrument.
If you type into the grid, press Backspace, Delete or Insert, or paste with a shortcut while Edit Mode is off, the grid and the Edit Mode button signal that nothing changed. Turn on Edit Mode (Enter) to make changes.
Only a key pressed on its own or with Shift types into the grid. A key pressed while holding Ctrl or Alt never does, whatever field the cursor is on: it writes no note, letter or digit and plays no note. Those keys are kept for shortcuts, such as Alt+1–Alt+9 to select an instrument, so a key that is not a shortcut does nothing.
If you would rather never leave Edit Mode, turn on Always stay in Edit Mode in the Pattern Editor group of General Settings. The Edit Mode button is then hidden, and Enter no longer turns it off.
Edit Step
The Step value in the toolbar controls how many rows the cursor advances after each entry while Auto-cursor advance is set to Advance by Edit Step (the default):
0: Cursor stays on the same row (useful for entering chords across channels)1: Advances one row (default for step-by-step entry)- Up to
16: Skips rows for sparse entry patterns
Change it with Shift+= and Shift+- (or the numpad equivalents), which work wherever the octave keys = and - do (see Changing Octaves), or with the stepper's buttons.
The edit step applies only while playback is stopped; during live recording the cursor stays where it is.
Auto-cursor advance decides where the cursor moves after you enter a note, instrument number or effect. Pick one of its choices from the button's menu on the toolbar, or with its shortcut:
| Choice | Shortcut | Where the cursor moves |
|---|---|---|
| Off | Ctrl+U |
Nowhere. You can type a whole value in place, such as the letter, the mode and both digits of SS06, or stack a chord across channels |
| Advance by Single Line | Alt+Shift+1 |
One row down, whatever the edit step |
| Advance by Edit Step | Alt+Shift+2 |
Down by the edit step. This is the default |
| Hop Over Gaps | Alt+Shift+3 |
Down to the next row where the cell you are typing in is filled, skipping the empty ones and OFF notes, whatever the edit step. Useful for retyping notes or values already written |
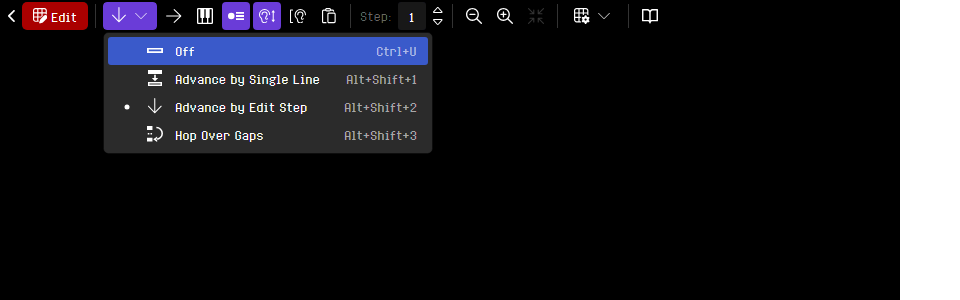
Ctrl+U turns the advance off, and pressed again turns it back on in the choice you had. With the advance off, moving up or down keeps the cursor on the same digit, so you can change one digit on several rows in turn. Hold Shift while entering a note, instrument number or effect to invert the setting for that one entry: with the advance on, the cursor stays on the row; with it off, it moves as your last choice would. On a note key, Shift also flips Auto-instrument.
Clearing a cell or a row with Backspace, Ctrl+Backspace or Ctrl+Shift+Backspace moves the cursor the same way, and leaves it on the row while the advance is off. Stamp Down (Ctrl+Shift+D) copies the cell to the row your choice moves to (one row down, the edit step down, or the next filled cell) and follows it, even while the advance is off.
To type effects in place but still have notes and instrument numbers advance, leave Auto-cursor advance on and turn on the Stay on row in effect columns toggle beside it (off by default). Typing an effect then keeps the cursor on its row, stepping through the effect's digits, while a note or instrument number still moves the cursor as Auto-cursor advance says. Shift inverts it for one entry here too.
Effects
Effects modify sound parameters or control playback. Each row can have up to 5 effects (the number of effect columns is set in the song properties). Effects are entered as a letter followed by hex digits.
Type the letter first: a digit typed into an empty slot is ignored.
Six effects have a mode letter right after the effect letter, before any digits: Q (N for an arpeggio table, V for a vibrato table), S (S for the song speed, W to swing it, N for the arpeggio speed, I for the instrument speed) Y (X, M or T, what the sample does to the note) R (S to reset every effect, Z to freeze the slides, Y to continue them) K (M to mute the note, U to unmute it) and X (L to delay the note, X to cut it). To change it, move the cursor to the second place of the effect, right after the effect letter, and type the mode letter; a hex digit typed there does nothing. The cursor then moves on to the first digit, unless it moves to the next row. A new Q starts with N, a new S with S, a new R with S, a new K with M and a new X with L. See Mode Letters.
The 40 supported effects in brief:
- Arpeggio —
A(3-note),B(4-note),QNnn(arpeggio table),SNnn(arpeggio speed) - Pitch —
E(pitch down),F(pitch up),I(semitone bend down),J(semitone bend up),G(portamento),L(semitone portamento),T(transpose) - Volume —
V(volume set),U(volume slide up),W(volume slide down) - Vibrato —
H(rate + depth),QVnn(vibrato table) - Samples —
Y(sample trigger),M(sample offset),Z(sample retrigger) - Playback —
SSnn(speed),SWxy(swing),O(row length),SInn(instrument speed),P(instrument step),D(pattern break),RS(reset),RZ(freeze slides),RY(continue slides) - Channel —
KM(mute note),KU(unmute note),KVn(set fader),KInn(fade in),KOnn(fade out),KTnn(set detune),KLnn(detune down),KHnn(detune up),KRnn(return detune) - Note timing —
XLnn(note delay),XXnn(note cut),N(note retrigger)
Memory Effects
E, F, G, I, J and L written with 000, and KI, KO, KL, KH and KR written with 00, reuse the last non-zero value of that same effect on that channel. In Non-trailing Effects mode, that is the short way to keep a slide going row after row. See 5. Main Window.
Trailing Effects
Arpeggios, slides, portamento, vibrato, instrument and arpeggio speed, transpose, retriggers and the tables keep running on later rows until stopped; Trailing Effects lists what stops each. In Non-trailing Effects mode, each lasts only for its own row. See 5. Main Window.
Pitch Bends or Semitone Bends?
E and F move the pitch by a fixed amount of the chip's tone period each tick, so the same value bends a high note faster than a low one. Use them for fine, precise movements. I and J move it by 256ths of a semitone each tick, so J100 rises a semitone a tick on any note. Use them for wide sweeps and dives that should sound the same on every note. All four continue one bend, so you can switch from one to another and the pitch carries on from where it got to.
See 19. Complete Effect Reference for all effect letters, parameter formats, and descriptions.
Drawing an Effect Curve
To shape a fade, a speeding slide or a slowing song speed, select the rows, then right-click and choose Draw Curve... or press Ctrl+K. Without a selection the curve covers the whole track, and double-clicking an effect opens it there on that effect. A curve works on one effect column at a time, so an effect found in several selected columns is not offered; select one column instead (Ctrl+Shift+T selects the cursor's column).
This opens the instrument editor's curve editor (see Drawing a Curve), with the selected rows along the bottom and the effect's values up the side. It draws effects that set an amount: volume (V), volume slides (U, W), pitch bends and portamento (E, F, I, J, G, L), speed (SSnn), instrument speed (SInn), arpeggio speed (SNnn), sample offset (M), transpose (T, in semitones) and row length (O, in ticks). Draw Curve... is unavailable when the rows contain none of these.
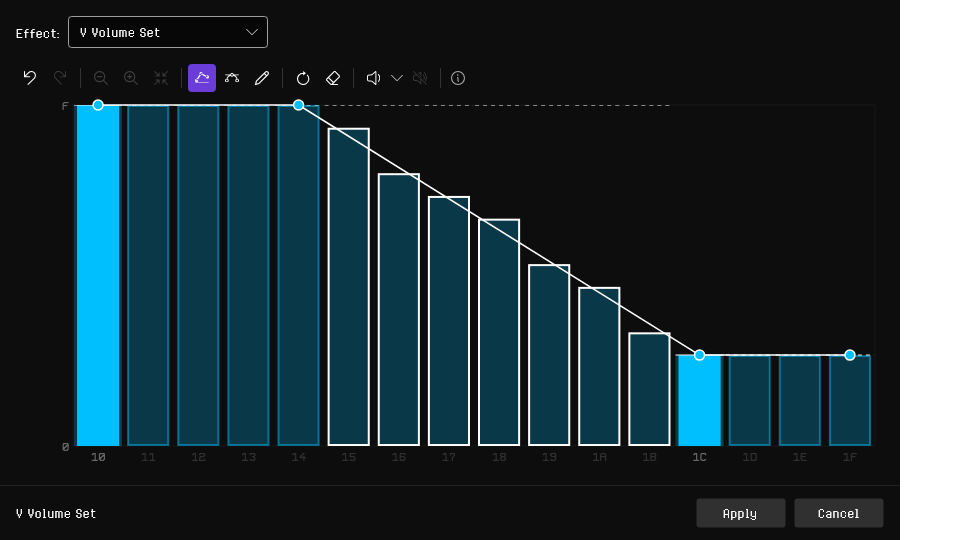
When the rows contain more than one of these effects, choose one from the Effect list above the graph; it opens on the effect under the cursor.
The curve starts from the value each row plays, so a row without the effect follows the one above it. When you apply the curve:
- A row with the effect takes the curve's value.
- An empty row gets the effect only where the curve changes what it plays.
- A row whose value the graph cannot show, such as
SI80orSI00, keeps its value unless you move it. - A row with a different effect in that column is skipped.
Rows without the effect, and rows the curve changes, are marked on the graph; right-clicking a row away from the points restores its value. It works with Edit Mode off, and Ctrl+Z undoes the whole curve.
Play the song while the editor is open to hear the change as you draw; a line marks the row being played. Cancel puts the rows back. The piano keys and a MIDI keyboard play the selected instrument without entering notes (see Drawing a Curve).
Navigation Shortcuts
| Key | Action |
|---|---|
| Arrow keys | Move cursor one cell; hold Shift to extend selection |
Ctrl+Left / Ctrl+Right |
Move to the start of the previous/next cell, skipping the digits in between and moving into the neighboring channel at its edge |
Shift+Enter |
Move down one row, onto the start of the cell, so the next instrument number or effect is typed from its first digit |
Tab / Shift+Tab |
Next/previous channel |
Alt+Left / Alt+Right |
Alt+Left goes to the start of the channel the cursor is on, and to the start of the channel before it when already there; Alt+Right jumps to the next channel, or to the right edge of the last one |
Ctrl+Up / Ctrl+Down |
Scroll the pattern view up/down without moving the cursor |
PageUp / PageDown |
Move the cursor 16 rows; hold Shift to extend selection |
Home / End |
Jump to first/last row; hold Shift to extend selection |
Ctrl+Shift+Left / Ctrl+Shift+Right |
Extend the selection by one cell to the left/right |
Alt+Shift+Left / Alt+Shift+Right |
The same movement as Alt+Left / Alt+Right, extending the selection as it goes |
Alt+Shift+Up / Alt+Shift+Down |
Extend the selection up/down by one row, across all channels |
Ctrl+Alt+Shift+Up / Ctrl+Alt+Shift+Down |
Extend the selection up/down by the edit step, across all channels |
F9 / Ctrl+Enter |
Put the keyboard on the pattern grid from anywhere |
The keyboard shortcut reference lists these with the rest of RhYMe's keys, including the octave keys and the other keys for entering notes.
Selecting
Drag across the grid to select a block, or hold Shift while clicking or using the arrow keys to extend from the cursor. Click a row number to select that whole row, drag down the row numbers to select several rows, or click a channel label to select a track. Cut, Copy, Clear, Transpose and the volume adjustments then act on the selection.
Clicking a cell does not select it. A click only moves the cursor, so you can click where a paste should land without losing the selection. Clicking outside the selection, clicking twice inside it, Escape or Select > Deselect on the right-click menu clears it.
To select a single cell, drag a little way inside it.
To select several whole tracks, click a channel label and Ctrl+click another. Ctrl+click a selected track to deselect it. The selected tracks are always next to each other: selecting a track also selects the ones between, and a track between two selected ones stays selected.
To select whole columns, drag across a channel header. Dragging from a channel label across the header selects every row of the columns you pass over, such as just the notes and instruments or one effect column, even into the next channel. Ctrl+Shift+T, or Select > Column on the right-click menu, selects the cursor's column.
A selection survives switching patterns, so you can copy in one pattern, click the spot you want in another, and paste.
To listen to a passage on repeat, select it and press Ctrl+F6, or choose Play Selection in Loop on the right-click menu. Playback plays the selected rows over and over, whichever channels the selection covers, and starts every pass on the first selected row with the song sounding as it does there, so each pass sounds the same. The selection must span at least two rows. Press F8 to stop, or Shift+F7 to let playback carry on through the song.
Transposition
When the cursor is on a note field:
| Key | Action |
|---|---|
[ / ] |
Decrement/increment note by one semitone |
Alt+Down / Alt+Up |
Alternate binding for [ / ], easier to reach on compact macOS keyboards |
Alt+Ctrl+Down / Alt+Ctrl+Up |
Octave variant of the above: transpose down/up by one octave (-12/+12) |
Shift+[ / Shift+] |
Transpose down/up by one octave (-12/+12) |
On an instrument number or an effect, [ and ] and their alternate binding count the value down or up by one instead, and the octave variant by 16 (by one on an effect with a single digit). An empty effect slot is left as it is, and Shift+[ and Shift+] act on notes only.
Changing the instrument number of a row with a note, by counting it up or down or by typing a digit of it, plays the note with its new instrument, so you can try one instrument after another and hear each. Preview note on change turns this off along with the transpose preview.
With the mouse, Alt+wheel over a cell puts the cursor there and counts its note or value up or down as ] and [ do; Alt+Shift+wheel takes the bigger steps of the octave variant. Like the keys, it needs Edit Mode.
With a block selection, these keys transpose every note in it. They never create a note in an empty cell, and they leave notes played by an achromatic instrument alone, since those sound at a fixed pitch.
Transposing keeps notes between C-0 and B-9: an octave transpose stops at either end, while [ and ] on a single note wrap around.
Each transpose plays a short preview of the new note. Turn this off with Preview note on change on the pattern editor toolbar.
The same transpose operations are on the pattern grid's right-click menu, which transposes the block selection when there is one and otherwise the note at the clicked cell.
Editing a Selection
These change a whole passage at once, usually one you have selected (see Selecting).
Louder and Quieter
Select a block with Volume (V) effects, or put the cursor on a row with one, and press Ctrl+Shift+Up to make them louder or Ctrl+Shift+Down to make them quieter, or use the right-click Adjust Volume sub-menu. Each Volume effect moves by one within 0–15, nothing else changes, and one undo puts it back.
Stretching and Compressing
Select a passage and press Ctrl+G, or choose Transform… from the Edit menu or the right-click menu, to stretch or compress it. At 2× each row moves twice as far from the top of the selection; at 1/2× the rows close up and the bottom half is left blank. It also works on the track, the pattern, the patterns of the selected song slots or the whole song, and can change the pattern length so nothing is lost. See the Transform dialog.
Reversing
Press Ctrl+Shift+R, or choose Reverse Content from the right-click menu, to reverse the order of the rows, so a rising run of notes falls. With a selection, only the selected fields change; with nothing selected, the whole pattern is reversed across every channel. Choose it again to put them back.
Pasting
With a selection, a paste starts at its top-left and stops at its edges, trimming a bigger block; without one, it starts at the cursor. This applies to a single row copied with nothing selected, and to Paste Special too.
A paste leaves the cursor on what it wrote. Paste and Advance (Ctrl+Shift+V) puts it on the row below instead, spaced by the Step when that is above 1, so repeated pastes stack: at a step of 4, a one-row phrase lands on every fourth row. The Step spaces pastes only while Auto-cursor advance is set to Advance by Edit Step; with Advance by Single Line or Hop Over Gaps it is left out and the cursor goes to the row directly below the paste. The Move cursor below paste toggle does this on every paste.
Editing Shortcuts
| Key | Action |
|---|---|
Ctrl+Z / Ctrl+Shift+Z |
Undo / Redo |
Ctrl+X / Ctrl+C / Ctrl+V |
Cut / Copy / Paste |
Ctrl+Shift+V |
Paste and Advance |
Ctrl+Alt+O |
Paste Overlay |
Ctrl+Alt+U |
Paste Underlay |
Ctrl+Alt+I |
Paste Insert |
Del |
Delete current row or selection |
Shift+Del |
Delete row on all channels |
Ins |
Insert blank row |
Shift+Ins |
Insert blank row on all channels |
Ctrl+Backspace |
Clear track row, then move the cursor as Auto-cursor advance does |
Ctrl+Shift+Backspace |
Clear pattern row, then move the cursor as Auto-cursor advance does |
Alt+Backspace |
Clear current track |
Alt+Shift+Backspace |
Clear current pattern |
Ctrl+D |
Duplicate current pattern |
Ctrl+Shift+D |
Stamp Down (copy cell down to where Auto-cursor advance moves, or duplicate a block selection below itself) |
Ctrl+Shift+R |
Reverse Content (reverse the rows of the selection, or of the whole pattern) |
Ctrl+Shift+Up / Ctrl+Shift+Down |
Louder / quieter: adjust Volume effects in the selection, or on the cursor's row |
Ctrl+G |
Transform: stretch or compress rows |
Ctrl+K |
Draw Curve: shape an effect over the selected rows |
Rows aren't lost when you insert
Inserting a row sets aside the row pushed off the end of the pattern, and deleting a row brings it back, so an insert followed by a delete changes nothing. Any other edit lets the set-aside rows go.
Undo jumps to the edited pattern
Undo and redo go back to the pattern and song position where the edit was made, so you see the change.
Undo puts the cursor back
Undo returns the cursor to where it was when you made the edit, down to the digit, and redo to where the edit left it.
Deferred cut
A cut clears its cells only when you paste, here or in another pattern, and both undo as one step. Cut content pastes once. Anything but moving the cursor, scrolling or switching patterns cancels the cut. To cancel it yourself, press Escape or choose Deselect when nothing is selected; the cells keep their contents. To clear the cut cells straight away, cut again with nothing selected; you can still paste the cut content afterwards.
Single-cell selections
With a single cell selected, Cut, Copy, Clear and Transpose act on that field alone. With no selection, Cut and Copy take the whole channel row at the cursor.
MIDI Input
With a MIDI keyboard connected (see MIDI Settings), you can enter notes from it into the selected channel. Its toggles are on the MIDI toolbar. Turn off MIDI note input and its notes are neither heard nor entered anywhere, while its wheels keep working. Auto-instrument decides whether the instrument is written with each note; MIDI entry has no Shift to flip it.
With the main toolbar's Polyphonic previewing on, up to three held notes sound at once, and a fourth replaces the one held longest. An instrument that uses the hardware envelope plays one note at a time even then, since the chip has only one envelope generator to share between its notes. Previewing an instrument with a click, such as Preview Instrument or double-clicking it in the list, plays it alone and stops the held notes.
With it off, preview plays one note at a time:
- Holding several keys plays the most recent one. Lifting it drops back to the key pressed before it, like a monophonic synthesizer.
- This happens while Stop note preview on key release is on, or, with that off, while Resume held note on release on the MIDI toolbar is on (the default).
- With the grid focused and Edit Mode on, the note you drop back to is also written, as if you had just pressed it.
When you release the last held key, the Stop note preview on key release toggle on the main toolbar (on by default) decides whether the preview stops. When it is off, the preview keeps sounding.
Recording OFF Notes
During live recording (Edit Mode on, grid focused, song playing), releasing a note key writes an OFF note (===) at the cursor, so notes last as long as their keys were held. This works the same for MIDI keys and note keys on the computer keyboard. No OFF note is written after a tap shorter than a row, when the channel is already silent, or for a key that did not write a note. Turn Record OFF notes off on the pattern editor toolbar to record only the notes; whether the preview stops on release does not change this.
Holding a key previews its note once; auto-repeat does not retrigger it. Note keys on the computer keyboard behave the same way.
MIDI notes are written into the pattern only while the grid has focus and Edit Mode is on; they always preview. While MIDI entry is on in the arpeggio editor and its value grid has focus, they go into the arpeggio instead, and while the arpeggio or vibrato editor has focus they preview through the selected table (see Arpeggios & Vibratos).
Entering chords as arpeggios
Turn on Enter chords as arpeggios on the MIDI toolbar, or press Ctrl+J in the pattern grid, and keys you strike together are entered on one row: the lowest key as the note, with an inline arpeggio through the others. Play C, E and G together and the row reads C-4 with A47.
- Keys count as one chord only when struck within a fraction of a second; a later key, even while the others are held, starts a new note.
- One or two other keys give a 3-note arpeggio (
A); three give a 4-note one (B). - Keys more than 15 semitones above the note, and any past the fourth, are left out.
- The arpeggio goes into the row's arpeggio column or else the first empty effect column; if there is none, only the note is written.
- Lifting some keys keeps the arpeggio. During live recording, only letting go of the last key writes an OFF note.
The chord plays for its own row. Each key added to a chord is undone on its own. With the toggle off, which is how RhYMe starts out, every key you play enters a separate note.
Warnings
RhYMe checks your song as you work and points out rows that will not sound the way they are written. A warning never stops the song from playing, saving or exporting.
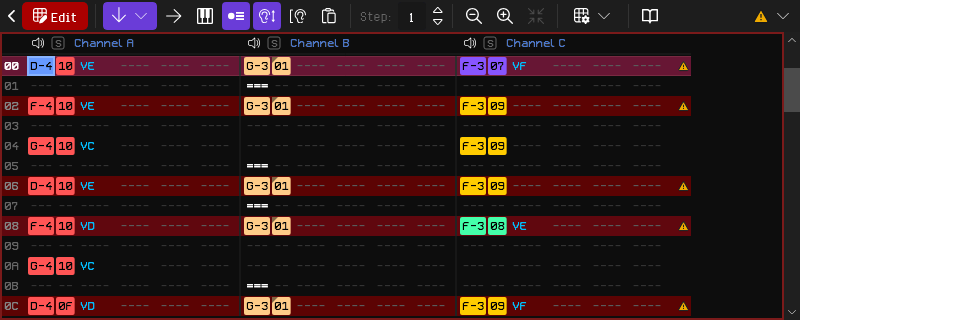
A warned row is highlighted and has a warning mark at its end; hover the mark to read the warning.
Some warnings are resource fights: two parts of the song reaching for the same piece of the chip at once, which playback sorts out itself. They are often intended, so they are shown less prominently, and the song editor does not mark their slots.
When a warning concerns one cell - a missing instrument, a note outside its key range or without sound, or an effect another one overrides - that cell is marked too; hover it to read what is wrong. Warnings about a whole row, such as too many timers or a resource fight, mark no cell.
The pattern toolbar shows a warning menu while the pattern has warnings. Hover it for the count; open it for an item per kind of warning, with how many rows have it. The song editor marks every slot whose pattern has a warning.

Hover an item for what the warning means and how to fix it; choose it to move the cursor to the first row with that warning. Too many Atari ST waves, a warning about the whole song, is listed on every pattern. Warning Settings... at the bottom opens the Analysis tab of General Settings, where you can turn kinds of warning off.
Too many timers at once
A row that needs more of the Atari ST's hardware timers than the song may use. A channel takes one timer for whatever it starts on a row that needs one: an instrument whose steps drive a timer or that plays an instrument sample, or a sample trigger.
Channels that find no timer free sound without one: the sample stays silent, and an instrument's timer effect does nothing. Allow the song more timers in the song properties, or move one of the effects to another row. Channels kept off timers are not counted; they have a separate warning.
The song editor marks the slot of every pattern with this warning. See Song Editor.
Timer on a disallowed channel
A row that starts something needing a timer - an instrument whose steps drive one, or a sample trigger - on a channel the song's Timer channels setting keeps off timers. It sounds without a timer even when one is free, and the warning says which channel. Allow timers on that channel in the song properties, or move the effect to a channel that may use one.
Missing instrument
A row with an instrument number your song does not have. The channel goes on playing whatever was sounding, or stays silent. This happens when you delete an instrument that rows still use, or bring in a pattern from a song with more instruments. Add the instrument back or change the rows to a number your song has; the warning shows the channel and the number.
An OFF note is never warned about, but a row with only an instrument number is, since the number alone changes what the channel plays.
Envelope resource fight
Two channels play through the hardware envelope at the same time. The YM2149 has only one envelope generator: the last note to use it takes it over, and the other channel plays at its fixed volume instead, or falls silent if the envelope was all it had. The mark is on the row where this starts and shows both channels.
RhYMe finds this by playing the song through a moment after you stop editing, so the mark can appear or clear a moment later. Patterns the song does not play are not checked.
To avoid it, end the first note before the second starts, or play one of the parts with an instrument that does not use the envelope.
Noise resource fight
Two channels play noise at different noise periods at the same time. The YM2149 has one noise generator, so both hear the period of the channel further along (C over B, B over A), each at its own volume. A channel whose volume is 0 does not count unless the envelope, a timer effect or a sample keeps it sounding. The mark shows the channel whose noise is replaced and the one it gets. Equal periods are not a fight.
This can look like a fault in the losing channel: a quiet clap can seem to ignore its volume when a louder sound on another channel is playing its noise. It is found the same way as the envelope resource fight.
To avoid it, move one of the sounds to another row, or give both the same noise period.
Note out of key range
A note outside its instrument's key range (see Instrument Editor). It sounds nothing and stops what the channel was playing, like an OFF note; the next note in range plays again. The note is marked, and the warning shows the channel, note, instrument and range.
The instrument is the one on the row, or the last one above it on the channel, which can be in the previous pattern. Move the note into range, use another instrument, or widen the range. Achromatic instruments are never warned about.
Note without sound
A note that makes no sound, for one of two reasons:
- Its instrument makes no sound, whatever note it plays. This happens when every step of the instrument is at volume 0, or when the instrument's own volume turns its steps down to nothing, and no step plays the envelope, a timer effect or a sample. Raise the volume of the instrument or its steps, or use another instrument.
- It has no instrument. A note without an instrument plays the last instrument above it on the channel, which can be in the previous pattern; a note with none above it, from the start of the song, has nothing to play it with. Give the note an instrument. A pattern the song does not play is not checked for this, since it does not yet have anything before it.
The note is marked, and the warning shows the channel and the note, and the instrument if it has
one. A row that also triggers a sample (Y) plays the sample, so it is not warned about.
High CPU usage
A row where the Atari ST replay is estimated to take more of a frame than the CPU usage warning level in the General Settings, 80% by default. The replay then leaves little time for a program playing the tune, such as a demo or a game. The estimate is the same one the song editor's event strip shows as the CPU load, so the warning appears once the song has been played through after an edit.
The warning shows the row's estimated CPU usage and the level. To lighten the row, play fewer samples, timer effects or volume transformations at the same time, or raise the level if the tune is meant to play on its own.
Conflicting effect
An effect overridden by a later one on the same row, so it does nothing. Effects apply channel by
channel, A to C, and left to right, and the later of two that set the same thing wins: in V8
then VC, the V8 is never heard. A and B, the four bends E, F, I and J, the two
portamentos G and L, and U and W each count as one setting.
A volume (V) also overrides an earlier volume slide, a bend (E, F, I, J) with a value overrides
an earlier portamento (G, L), and a reset (RS) overrides every earlier effect on its channel except
speed, pattern break, row length, sample trigger and XL, XX, N. A freeze (RZ) overrides an earlier
volume slide, and an earlier bend or portamento written with 000. A continue (RY) overrides an
earlier freeze, and a freeze an earlier continue. A mute (KM) and an unmute (KU) override each
other the same way. Setting the fader (KV) overrides an earlier fade or fader, a fade in and a fade out
override each other, and so do the detune slides (KL, KH, KR), which setting the detune (KT) overrides; a freeze overrides any of them
written with 00.
Song speed (SSnn), pattern break (D) and row length (O) apply to the whole song, so they are compared
across channels: a speed on channel C overrides one on channel A.
The overridden effect is marked, and the warning shows both effects. Remove one, or move one to another row.
Redundant effect
An effect that repeats an earlier one on the same row with the same value, or E000, F000 or
G000 right after the same effect with a speed. The row plays the same without it. The repeat is
marked and the warning shows both effects; remove it or change its value.
An effect written again after something overrode it, such as a volume after a reset, is not a repeat.
Invalid sample trigger
A sample trigger (Y) with no sample (YX00), a sample number your song does not have, or a digit
instead of the mode letter X, M or T right after the Y (such as Y305), which only a song
from an earlier version can have. It is ignored, so the sample is missing. This usually
comes from deleting a sample that rows still trigger, or from a pattern brought in from another
song. The effect is marked and the warning says what is wrong; change it to a sample in the
sample list or to a valid mode.
Missing arpeggio or vibrato table
An arpeggio table (QNnn) or vibrato table (QVnn) effect for a table your song does not have. It
stops the running table, as QN00 or QV00 would, but plays none. This usually comes from a
mistyped number or a pattern from another song; deleting a table turns its effects into QN00 or QV00
instead. The effect is marked and the warning shows the table number; change it to a table in the
Arpeggios or Vibratos list, or to 00.
Delay or cut past the end of the row
A note delay (XL) or note cut (XX) of as many ticks as the row lasts, or more. Neither reaches
the next row, so a delayed row is left out altogether, and a cut leaves the note sounding.
A row lasts as long as the song's speed (SSnn, on the row or before it), lengthened or shortened by a
row length effect (O) on the row. Where a pattern
plays at more than one speed, the warning gives the longest the row lasts where the effect is
still too long. The effect is marked. Use fewer ticks, raise the speed, or lengthen the row with
O.
Speed of zero
A song speed effect written as SS00, or a swing with one speed of zero (SW60, SW06). A
row cannot last zero ticks, so the effect sets no speed and is ignored: the song keeps the speed it
has. This usually comes from a speed left out, or from
SN00 or SI00 mistyped, which do return the arpeggio or the instrument to its own speed. The
effect is marked; write the speed you mean, from 01 to FF (1 to F for each speed of a
swing), or remove the effect. SW00 ends a swing and is not marked.
Too many Atari ST waves
The song uses more than the 127 waves an Atari ST tune can contain, so the SNDH and program exports will refuse it. Every sample and wavetable counts once for every volume it is copied at. This warning is about the whole song rather than a row, so it is listed on every pattern and marks no row, and it cannot be turned off. Choose it to open the Song tab, where any Optimize for setting but Least CPU usage brings the song back under (see Atari ST Exports).